Lincoln Aviator: Child Safety / Booster Seats
WARNING: Do not put the shoulder section of the seatbelt or allow the child to put the shoulder section of the seatbelt under their arm or behind their back. Failure to follow this instruction could reduce the effectiveness of the seatbelt and increase the risk of injury or death in a crash.
Use a belt-positioning booster seat for children who have outgrown or no longer properly fit in a child safety restraint (generally children who are less than 57 in (1.45 m) tall, are greater than age 4 and less than age 12, and between 40 lb (18 kg) and 80 lb (36 kg) and upward to 100 lb (45 kg) if recommended by your child restraint manufacturer). Many state and provincial laws require that children use approved booster seats until they reach age eight, a height of 57 in (1.45 m) tall, or 80 lb (36 kg).
Booster seats should be used until you can answer YES to ALL of these questions when seated without a booster seat:
- Can the child sit all the way back against their vehicle seat backrest with knees bent comfortably at the edge of the seat cushion?
- Can the child sit without slouching?
- Does the lap belt rest low across the hips?
- Is the shoulder belt centered on the shoulder and chest?
- Can the child stay seated like this for the whole trip?
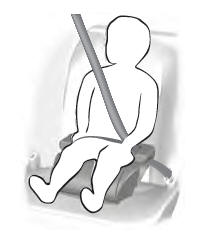
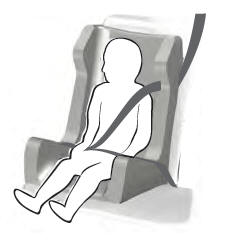
Always use booster seats in conjunction with your vehicle lap and shoulder belt.
Types of Booster Seats
- Backless booster seats
If your backless booster seat has a removable shield, remove the shield. If a vehicle seating position has a low seat backrest or no head restraint, a backless booster seat may place your child's head (as measured at the tops of the ears) above the top of the seat. In this case, move the backless booster to another seating position with a higher seat backrest or head restraint and lap and shoulder belts, or consider using a high back booster seat.
- High back booster seats
If, with a backless booster seat, you cannot find a seating position that adequately supports your child's head, a high back booster seat would be a better choice.
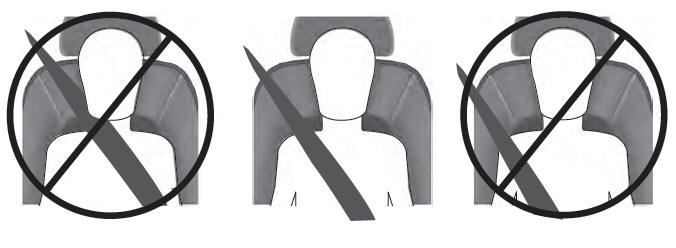
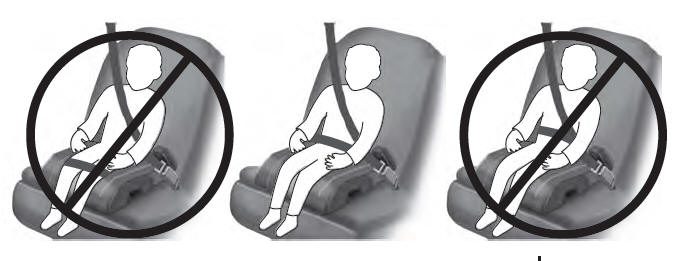
Children and booster seats vary in size and shape. Choose a booster that keeps the lap belt low and snug across the hips, never up across the stomach, and lets you adjust the shoulder belt to cross the chest and rest snugly near the center of the shoulder. The following drawings compare the ideal fit (center) to a shoulder belt uncomfortably close to the neck and a shoulder belt that could slip off the shoulder. The drawings also show how the lap belt should be low and snug across the child's hips.
If the booster seat slides on the vehicle seat upon which it is being used, placing a rubberized mesh sold as shelf or carpet liner under the booster seat may improve this condition. Do not introduce any item thicker than this under the booster seat. Check with the booster seat manufacturer's instructions.
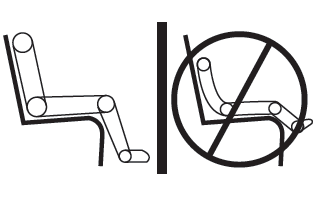
 Using Tether Straps
Many forward-facing child
restraints include a tether strap
which extends from the back of the
child restraint and hooks to an anchoring
point called the top tether anchor...
 Child Restraint Positioning
WARNING: Do not place a rearward
facing child restraint in front of an active
airbag. Failure to follow this instruction
could result in personal injury or death...
Other information:
Lincoln Aviator 2020-2026 Service Manual: Removal and Installation - Front Halfshaft Speed Sensor
Materials Name Specification Motorcraft® SAE 75W-140 Synthetic Rear Axle LubricantXY-75W140-QL WSL-M2C192-A Removal With the vehicle in NEUTRAL, position it on a hoist. Refer to: Jacking and Lifting (100-02 Jacking and Lifting, Description and Operation)...
Lincoln Aviator 2020-2026 Service Manual: General Procedures - Electronic Leak Detection - Vehicles With: R134A Refrigerant
Special Tool(s) / General Equipment Electronic Leak Detector Inspection NOTE: Use a Rotunda-approved Electronic Leak Detector for R-134a refrigerant SAE Certified to J2791. NOTE: Good ventilation is necessary in the area where electronic A/C leak testing is to be carried out...
Categories
- Manuals Home
- Lincoln Aviator Owners Manual
- Lincoln Aviator Service Manual
- Child Safety Locks
- Fuel Quality
- Garage Door Opener
- New on site
- Most important about car
Adjusting the Steering Wheel - Vehicles With: Manual Adjustable Steering Column
WARNING: Do not adjust the steering wheel when your vehicle is moving.
Note: Make sure that you are sitting in the correct position.
Unlock the steering column. Adjust the steering wheel to the desired position.