Lincoln Aviator: Installing Child Restraints / Using Tether Straps
 Many forward-facing child
restraints include a tether strap
which extends from the back of the
child restraint and hooks to an anchoring
point called the top tether anchor. Tether
straps are available as an accessory for many
older child restraints.
Many forward-facing child
restraints include a tether strap
which extends from the back of the
child restraint and hooks to an anchoring
point called the top tether anchor. Tether
straps are available as an accessory for many
older child restraints.
Contact the manufacturer of your child restraint for information about ordering a tether strap, or to obtain a longer tether strap if the tether strap on your child restraint does not reach the appropriate top tether anchor in your vehicle.
Once you install the child restraint using either the seatbelt, the lower anchors of the LATCH system, or both, you can attach the top tether strap.
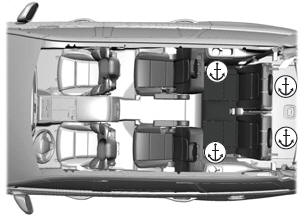
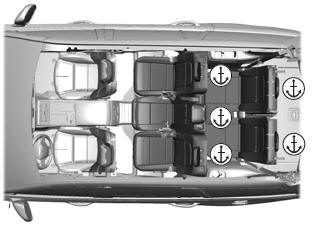
The tether strap anchors in your vehicle are in the following positions (shown from top view):
Second Row Bucket Seats and Third Row Seats
Second Row Bench Seats and Third Row Seats
Perform the following steps to install a child restraint with tether anchors:
Note: If you install a child restraint with rigid LATCH attachments, do not tighten the tether strap enough to lift the child restraint off your vehicle seat cushion when the child is seated in it. Keep the tether strap just snug without lifting the front of the child restraint. Keeping the child restraint just touching your vehicle seat gives the best protection in a severe crash.
For second row outermost seating positions, route the child restraint tether strap over the seat backrest, under the head restraint and between the head restraint posts. If needed, remove the head restraint to improve the fit of the child restraint or tether strap.
For the second row center seating position, route the child restraint tether strap over the top of the head restraint. If needed, remove the head restraint to improve the fit of the child restraint or tether strap.
For third row seating positions, route the child restraint tether strap over the seat backrest, under the head restraint and between the head restraint posts. If needed, fold the head restraint down to improve the fit of the child restraint or tether strap.
- Route the tether strap.
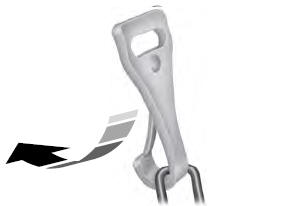
- Locate the correct anchor for the selected seating position.
- Clip the tether strap to the anchor as
shown. The tether hook may be twisted
½ turn to improve installation. If you clip
the tether strap incorrectly, the child
restraint may not be retained properly in
the event of a crash.
- Tighten the child restraint tether strap according to the manufacturer's instructions.
If the child restraint is not anchored properly, the risk of injury to a child greatly increases in a crash.
If your child restraint system has a tether strap, and the child restraint manufacturer recommends its use, we also recommend its use.
Second Row Bench Seats
Third Row Seats
Note: The cargo tie downs at the rear edge of the floor are not tether anchors.
 Using Lower Anchors and Tethers for CHildren (LATCH)
WARNING: Do not attach two child
safety restraints to the same anchor. In a
crash, one anchor may not be strong
enough to hold two child safety restraint
attachments and may break, causing
serious injury or death...
 Booster Seats
WARNING: Do not put the shoulder
section of the seatbelt or allow the child to
put the shoulder section of the seatbelt
under their arm or behind their back...
Other information:
Lincoln Aviator 2020-2026 Service Manual: Removal and Installation - Front Seatbelt Buckle
Removal NOTE: Removal steps in this procedure may contain installation details. NOTE: Driver seat shown, passenger seat similar. Remove the front seat. Refer to: Front Seat (501-10A Front Seats, Removal and Installation). Remove the front seatbelt buckle...
Lincoln Aviator 2020-2026 Service Manual: Removal and Installation - Rear Evaporator Rear Outlet and Inlet Line
Removal All vehicles NOTICE: During the removal or installation of components, cap, tape or otherwise appropriately protect all openings and tubes/fittings to prevent the ingress of dirt or other contamination. Remove caps, tape and other protective materials prior to installation...
Categories
- Manuals Home
- Lincoln Aviator Owners Manual
- Lincoln Aviator Service Manual
- USB Port and Power Point Locations
- Resetting the System
- Description and Operation - Jacking and Lifting
- New on site
- Most important about car
Activating Intelligent Access
The intelligent access key must be within 3 ft (1 m) of the door or luggage compartment you intend to lock or unlock.
At a Door
Electronic door handles are on each door. Gently depress the switch inside the exterior door handle to unlock and open the door. An unlock symbol illuminates on the door window trim indicating your vehicle is unlocked.
