Lincoln Aviator: Instrument Panel and Interior Switches Illumination / Description and Operation - Instrument Panel and Interior Switches Illumination - Overview
Overview
Dimmable Illumination
Dimmable illumination provides backlighting to switches and control components when the parking lamps are on. The instrument panel dimmer switch is used to increase or decrease the level of intensity for the dimmable backlit components. The BCM is the master module that controls the dimmable illumination.
Dimmable backlit switches and components are:
- Headlamp switch
- EPB switch
- Overhead console switches
- USB hub
- Active park assist switch
- Drive mode switch
- Sunshade switch
- Steering wheel switches
- Emergency call switch
- Power window switches
- Door lock switches
When the autolamp feature activates during the daytime, the message center illumination remains at full intensity and cannot be dimmed using the instrument panel dimmer switch. If the vehicle travels under a bridge or through a tunnel and a low level of ambient light is detected, the illumination brightness of the message center changes to the last level set by the BCM. The message center illumination changes back to full intensity when the intense ambient light is restored.
Non-Dimmable Illumination
The non-dimmable illumination is on when the delayed accessory is active. The delayed accessory is active:
- When the ignition is on.
- For up to 10 minutes after the ignition is cycled from on to off and a front door is not opened.
The second row rear seat control, third row rear seat control and liftgate release switches are non-dimmable.
 Description and Operation - Instrument Panel and Interior Switches Illumination - System Operation and Component Description
System Operation
System Diagram - Networked Illumination - Doors
NOTE:
Not all vehicles come equipped with all the items listed
below. The door latch modules are identified as follows:
Left front door - DCME
Right front door - DCMF
Left rear door - DCMG
Right rear door - DCMH
Item
Description
1
MS-CAN
2
DCME
3
Light sensor
4
DCMF
5
DCMH
6
DDM
7
PDM
8
RF door lock switch
9
RF door window control switch
10
LF door window control switch
11
RR door window control switch
12
LR door window control switch
13
LF door lock switch
14
RR door lock switch
15
LR door lock switch
16
GWM
17
DCMG
18
LH front interior door latch switch
19
RH front interior door latch switch
20
LH rear interior door latch switch
21
RH rear interior door latch switch
22
LIN
23
LIN
24
HS-CAN1
25
BCM
26
Dimmer switch
27
Headlamp switch
System Diagram - Networked Illumination - Steering Wheel Switches
Item
Description
1
Light sensor
2
RH lower steering wheel switch
3
RH upper steering wheel switch
4
LH lower steering wheel switch
5
LH upper steering wheel switch
6
SIMA
7
Upshift paddle switch
8
Downshift paddle switch
9
HS-CAN2
10
GWM
11
HS-CAN1
12
LIN
13
BCM
14
Dimmer switch
15
Headlamp switch
System Diagram - Networked Illumination - Other Modules
Item
Description
1
FCIM
2
APIM
3
Light sensor
4
ACM
5
IPC
6
FDIM
7
without Touchscreen
8
FCDIM
9
RHVAC
10
RACM
11
LIN
12
HS-CAN1
13
MS-CAN
14
HS-CAN3
15
GWM
16
Dimmer switch
17
Headlamp switch
18
BCM
Network Message Chart
Module Network Input Messages - ACM, APIM, DCME, DCMF, DCMG, DCMH, DDM, FCIM, RACM, RHVAC, SIMA, GWM, IPC and PDM...
Other information:
Lincoln Aviator 2020-2026 Service Manual: General Procedures - Plastic Repairs
Materials Name Specification Plastic Bonding AdhesiveTA-9 - Inspection NOTE: Plastics Identification WARNING: Before beginning any service procedure in this manual, refer to health and safety warnings in section 100-00 General Information...
Lincoln Aviator 2020-2026 Service Manual: Diagnosis and Testing - Noise, Vibration and Harshness (NVH)
Special Tool(s) Vehicle Communication & Measurement Module (VCMM™) Base Kit 164-R9822 / 164-R9823 EngineEAR107-R2100Chassis EarsJSP97170 Squeak And Rattle Kit164-R4900 Ultrasonic Diagnostic ToolTRATP-9367 Diagnostic Theory The shortest route to an accurate diagnosis results from: System knowledge, including comparison with a known good system...
Categories
- Manuals Home
- Lincoln Aviator Owners Manual
- Lincoln Aviator Service Manual
- Changing the Front Wiper Blades - Vehicles With: Heated Wiper Blades
- USB Port and Power Point Locations
- Tire Change Procedure
- New on site
- Most important about car
Children and Airbags
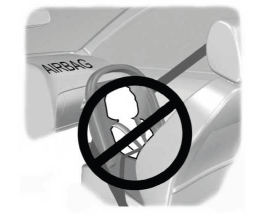
WARNING: Airbags can kill or injure a child in a child restraint. Never place a rear-facing child restraint in front of an active airbag. If you must use a forward-facing child restraint in the front seat, move the seat upon which the child restraint is installed all the way back.


