
Lincoln Aviator 2020-2026 Owners Manual / Maintenance / Changing the Engine Air Filter
Lincoln Aviator: Maintenance / Changing the Engine Air Filter
WARNING: To reduce the risk of vehicle damage and personal burn injuries, do not start your engine with the air cleaner removed and do not remove it while the engine is running.
When changing the engine air filter, do not allow debris or foreign material to enter the air induction system. Engine components are susceptible to damage not covered by the vehicle Warranty.
Change the air filter element at the correct interval.
Incorrect component use can cause damage not covered by the vehicle Warranty.
To replace the air filter element do the following:
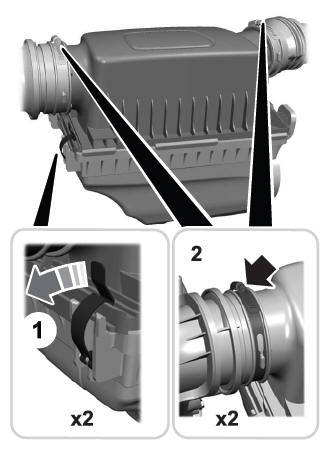
- Remove the clips that secure the air filter housing cover.
- Using a screwdriver, loosen two clamps on either side of the air filter housing cover.
- Gently pull the two boots back away from the air filter housing cover.
- Carefully lift the air filter housing cover.
- Remove the air filter element from the air filter housing.
- Wipe any dirt or debris from the air filter housing and cover to make sure no dirt gets in the engine and that you have a good seal.
- Install a new air filter element. Be careful not to crimp the filter element edges between the air filter housing and cover. This could cause filter damage and allow unfiltered air to enter the engine if it is not properly seated.
- Install the air filter housing cover.
- Engage the clips to secure the air filter housing cover to the air filter housing.
- Reconnect the two boots on the air filter housing cover and torque to 3.69 lb.ft (5 Nm).

 Engine Coolant Check
WARNING: Do not remove the
coolant reservoir cap when the engine is
on or the cooling system is hot. Wait 10
minutes for the cooling system to cool
down...
Other information:
Lincoln Aviator 2020-2026 Service Manual: Description and Operation - Lane Keeping System - System Operation and Component Description
System Operation Lane Keeping Alert and Lane Keeping Aid Item Description 1 Lane Keeping System Switch 2 IPMA 3 GWM 4 Camera Windshield Defrost Heater 5 RCM 6 SCCM 7 PCM 8 IPC 9 TRM 10 BCM 11 PSCM 12 with active cruise control 13 CCM 14 Windshield Network Message Chart Module Network Input Messages - IPMA Broadcast Message Originating Module Message Purpose Ambient air temperature filtered PCM Used to control the camera windshield defrost heater operation...
Lincoln Aviator 2020-2026 Service Manual: Diagnosis and Testing - Direct Current/Direct Current (DC/DC) Converter Control Module
Diagnostic Trouble Code (DTC) Chart Diagnostics in this manual assume a certain skill level and knowledge of Ford-specific diagnostic practices. REFER to: Diagnostic Methods (100-00 General Information, Description and Operation). Diagnostic Trouble Code Chart Module DTC Description Action DCDC P0A94:4B DC/DC Converter "A" Performance: Over Temperature GO to Pinpoint Test C DCDC P0D32:00 DC/DC Converter Over Temperature: No Sub Type Information GO to Pinpoint Test C DCDC P0E56:00 DC/DC Converter Input Voltage Too Low: No Sub Type Information GO to Pinpoint Test D DCDC P0E56:13 DC/DC Converter Input Voltage Too Low: Circuit Open GO to Pinpoint Test D DCDC P0E57:00 DC/DC Converter Input Voltage Too High: No Sub Type Information GO to Pinpoint Test E DCDC U0100:00 Lost Communication With ECM/PCM "A": No Sub Type Information GO to Pinpoint Test I DCDC U0111:00 Lost Communication With Battery Energy Control Module "A": No Sub Type Information GO to Pinpoint Test J DCDC U0412:00 Invalid Data Received From Battery Energy Control Module "A": No Sub Type Information GO to Pinpoint Test K DCDC U3000:04 Control Module: System Internal Failures GO to Pinpoint Test L DCDC U3000:41 Control Module: General Checksum Failure GO to Pinpoint Test M DCDC U3000:42 Control Module: General Memory Failure GO to Pinpoint Test M DCDC U3000:45 Control Module: Program Memory Failure GO to Pinpoint Test M DCDC U3000:49 Control Module: Internal Electronic Failure GO to Pinpoint Test M DCDC U3000:96 Control Module: Component Internal Failure GO to Pinpoint Test N DCDC U3003:16 Battery Voltage: Circuit Voltage Below Threshold GO to Pinpoint Test F DCDC U3003:17 Battery Voltage: Circuit Voltage Above Threshold GO to Pinpoint Test G DCDC U3003:62 Battery Voltage: Signal Compare Failure GO to Pinpoint Test H Global Customer Symptom Code (GCSC) Chart Diagnostics in this manual assume a certain skill level and knowledge of Ford-specific diagnostic practices...
Categories
- Manuals Home
- Lincoln Aviator Owners Manual
- Lincoln Aviator Service Manual
- Body and Paint
- Child Safety Locks
- Remove and Reinstall the Battery
- New on site
- Most important about car
Fastening the Seatbelts
The front outboard and rear safety restraints in the vehicle are combination lap and shoulder belts.
Insert the belt tongue into the proper buckle (the buckle closest to the direction the tongue is coming from) until you hear a snap and feel it latch. Make sure that you securely fasten the tongue in the buckle.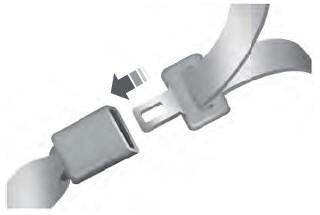

Copyright © 2026 www.liaviator2.com