
Lincoln Aviator 2020-2026 Service Manual / Powertrain / Automatic Transmission / Automatic Transmission - 10-Speed Automatic Transmission – 10R60 / Diagnosis and Testing - Torque Converter Clutch (TCC)
Lincoln Aviator: Automatic Transmission - 10-Speed Automatic Transmission – 10R60 / Diagnosis and Testing - Torque Converter Clutch (TCC)
Symptom Chart
Torque Converter Clutch (TCC)
For torque converter operation,
REFER to: Torque Converter (307-01A Automatic Transmission - 10-Speed Automatic Transmission – 10R60, Description and Operation).
Torque Converter Clutch (TCC)
| Condition | Possible Sources | Action |
| TCC does not apply | TCC solenoid mechanically stuck OFF |
INSTALL a new TCC solenoid. REFER to: Shift Solenoids (SS) (307-01A Automatic Transmission - 10-Speed Automatic Transmission – 10R60, Removal and Installation). |
| TCC priority valve stuck OFF |
DISASSEMBLE, CLEAN and INSPECT the TCC priority valve. If the bore, valve or spring is damaged, INSTALL a new main control valve body. REFER to: Main Control Valve Body (307-01A Automatic Transmission - 10-Speed Automatic Transmission – 10R60, Removal and Installation). |
|
| TCC regulator valve stuck OFF |
DISASSEMBLE, CLEAN and INSPECT the TCC regulator valve. If the bore or valve is damaged, INSTALL a new main control valve body. REFER to: Main Control Valve Body (307-01A Automatic Transmission - 10-Speed Automatic Transmission – 10R60, Removal and Installation). |
|
| TCC damper missing or damaged. |
DISASSEMBLE, CLEAN and INSPECT the TCC damper. If the damper is missing or damaged, INSTALL a new main control valve body. REFER to: Main Control Valve Body (307-01A Automatic Transmission - 10-Speed Automatic Transmission – 10R60, Removal and Installation). |
|
| Converter feed blow-off valve missing or damaged |
DISASSEMBLE, CLEAN and INSPECT the converter
feed blow-off valve. If the valve is missing or damaged, INSTALL a new
main control valve body. REFER to: Main Control Valve Body (307-01A Automatic Transmission - 10-Speed Automatic Transmission – 10R60, Removal and Installation). |
|
| CONV FD, MDA-TCC, APPLY, REL hydraulic circuit blocked or leaking |
DISASSEMBLE and INSPECT the main control
valve body and separator plate passages for debris, blockage and leaks.
CLEAN as necessary. REFER to: Main Control Valve Body (307-01A Automatic Transmission - 10-Speed Automatic Transmission – 10R60, Removal and Installation). |
|
|
REMOVE and INSPECT the front support
assembly and input shaft Teflon seals for damage, blockage and leaks. REFER to: Torque Converter (307-01A Automatic Transmission - 10-Speed Automatic Transmission – 10R60, Description and Operation). INSTALL new components as necessary. REFER to: Transmission (307-01A Automatic Transmission - 10-Speed Automatic Transmission – 10R60, Overhaul). |
||
| TCC friction material worn or damaged |
INSTALL a new torque converter.
REFER to: Transmission - 3.0L EcoBoost (307-01A Automatic Transmission - 10-Speed Automatic Transmission – 10R60, Removal and Installation). |
|
| TCC always applied/stalls vehicle | TCC solenoid mechanically stuck ON |
INSTALL a new TCC solenoid. REFER to: Shift Solenoids (SS) (307-01A Automatic Transmission - 10-Speed Automatic Transmission – 10R60, Removal and Installation). |
| TCC priority valve stuck ON |
DISASSEMBLE, CLEAN and INSPECT the TCC priority valve. If the bore or valve is damaged, INSTALL a new main control valve body. REFER to: Main Control Valve Body (307-01A Automatic Transmission - 10-Speed Automatic Transmission – 10R60, Removal and Installation). |
|
| TCC regulator valve stuck ON |
DISASSEMBLE, CLEAN and INSPECT the TCC regulator valve. If the bore or valve is damaged, INSTALL a new main control valve body. REFER to: Main Control Valve Body (307-01A Automatic Transmission - 10-Speed Automatic Transmission – 10R60, Removal and Installation). |
|
| CONV FD, MDA-TCC, APPLY, REL hydraulic circuit cross leaks |
DISASSEMBLE and INSPECT the main control
valve body and separator plate passages for cracks, warping, and damage.
If damage is found, INSTALL a new main control valve body. REFER to: Main Control Valve Body (307-01A Automatic Transmission - 10-Speed Automatic Transmission – 10R60, Removal and Installation). |
|
|
REMOVE and INSPECT the front support
assembly and input shaft Teflon seals for damage, blockage and leaks. REFER to: Torque Converter (307-01A Automatic Transmission - 10-Speed Automatic Transmission – 10R60, Description and Operation). INSTALL new components as necessary. REFER to: Transmission (307-01A Automatic Transmission - 10-Speed Automatic Transmission – 10R60, Overhaul). |
||
| TCC friction material worn or damaged |
INSTALL a new torque converter.
REFER to: Transmission - 3.0L EcoBoost (307-01A Automatic Transmission - 10-Speed Automatic Transmission – 10R60, Removal and Installation). |
|
| TCC cycles, shudders or chatters | Incorrect transmission strategy programmed into the TCM |
CARRY OUT the transmission strategy download and the adaptive learning drive cycle. REFER to: Transmission Strategy Download (307-01A Automatic Transmission - 10-Speed Automatic Transmission – 10R60, General Procedures). REFER to: Adaptive Learning Drive Cycle (307-01B Automatic Transmission - 10-Speed Automatic Transmission – 10R80 MHT, General Procedures). |
| TCC solenoid mechanically sticking |
INSTALL a new TCC solenoid. REFER to: Shift Solenoids (SS) (307-01A Automatic Transmission - 10-Speed Automatic Transmission – 10R60, Removal and Installation). |
|
| TCC priority valve sticking |
DISASSEMBLE, CLEAN and INSPECT the TCC priority valve. If the bore, valve or spring is damaged, INSTALL a new main control valve body. REFER to: Main Control Valve Body (307-01A Automatic Transmission - 10-Speed Automatic Transmission – 10R60, Removal and Installation). |
|
| TCC Regulator Valve sticking |
DISASSEMBLE, CLEAN and INSPECT the regulator
valve. If the bore or valve is damaged, INSTALL a new main control
valve body. REFER to: Main Control Valve Body (307-01A Automatic Transmission - 10-Speed Automatic Transmission – 10R60, Removal and Installation). |
|
| CONV FD, MDA-TCC, APPLY, REL hydraulic circuit blocked or leaking |
DISASSEMBLE and INSPECT the main control
valve body and separator plate passages for debris, blockage and leaks.
CLEAN as necessary. REFER to: Main Control Valve Body (307-01A Automatic Transmission - 10-Speed Automatic Transmission – 10R60, Removal and Installation). |
|
|
REMOVE and INSPECT the front support
assembly and input shaft Teflon seals for damage, blockage and leaks. REFER to: Torque Converter (307-01A Automatic Transmission - 10-Speed Automatic Transmission – 10R60, Description and Operation). INSTALL new components as necessary. REFER to: Transmission (307-01A Automatic Transmission - 10-Speed Automatic Transmission – 10R60, Overhaul). |
||
| TCC friction material worn or damaged |
INSTALL a new torque converter.
REFER to: Transmission - 3.0L EcoBoost (307-01A Automatic Transmission - 10-Speed Automatic Transmission – 10R60, Removal and Installation). |
 Diagnosis and Testing - Low One-Way Clutch Assembly
Low One Way Clutch
For low one way clutch operation, REFER to: Low One-Way Clutch Assembly (307-01A Automatic Transmission - 10-Speed Automatic Transmission – 10R60, Description and Operation)...
 General Procedures - Adaptive Learning Drive Cycle
Programming
NOTE:
Perform the adaptive learning drive cycle on a level road surface.
Using the scan tool, clear the DTCs (Diagnostic Trouble Codes) and Transmission Adaptive Tables...
Other information:
Lincoln Aviator 2020-2026 Service Manual: Removal and Installation - Front Seat Cushion Adjuster - Vehicles With: Multi-Contour Seats
Removal NOTE: Driver seat shown, passenger seat similar. Remove the front seat cushion cover. Refer to: Front Seat Cushion Cover - Vehicles With: Multi-Contour Seats (501-10A Front Seats, Removal and Installation). Cushion adjuster Remove the front seat cushion blower motor...
Lincoln Aviator 2020-2026 Service Manual: General Procedures - Cylinder Bore Taper
Check NOTE: Refer to the appropriate Section 303-01 for the specification. Measure the cylinder bore at the top, middle and bottom of piston ring travel in 2 directions as indicated. Verify the cylinder bore is within the wear limit. The difference indicates the cylinder bore taper...
Categories
- Manuals Home
- Lincoln Aviator Owners Manual
- Lincoln Aviator Service Manual
- USB Port and Power Point Locations
- Disabling Auto-Start-Stop
- Body and Paint
- New on site
- Most important about car
Child Safety Locks
When the child safety locks are set, you cannot open the rear doors from the inside.
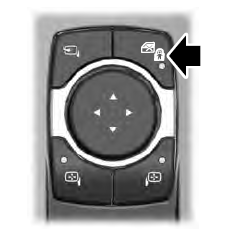
The child safety lock control is on the driver door.
Press the control to switch the child safety locks on. Press the control again to switch them off. A light on the child safety control illuminates when you switch them on.

Copyright © 2026 www.liaviator2.com