
Lincoln Aviator 2020-2026 Service Manual / Chassis / Driveline / Rear Drive Axle/Differential / Removal and Installation - Axle Assembly
Lincoln Aviator: Rear Drive Axle/Differential / Removal and Installation - Axle Assembly
Special Tool(s) / General Equipment
| Transmission Jack |
Removal
NOTE: Removal steps in this procedure may contain installation details.
-
Drain the rear differential fluid.
Refer to: Differential Draining and Filling (205-02 Rear Drive Axle/Differential, General Procedures).
-
Remove the rear halfshafts.
Refer to: Rear Halfshaft (205-05 Rear Drive Halfshafts, Removal and Installation).
-
Remove the rear driveshaft.
Refer to: Rear Driveshaft (205-01 Driveshaft, Removal and Installation).
-
Disconnect and position the axle assembly vent hose aside.
.jpg) |
-
Using the transmission jack support the rear axle assembly.
Use the General Equipment: Transmission Jack
.jpg) |
-
Remove and discard the rear axle assembly support front bolts.
Torque: 129 lb.ft (175 Nm)
.jpg) |
-
If equipped.
Remove and discard the rear axle housing support rear bolt.
Torque: 148 lb.ft (200 Nm)
.jpg) |
-
If equipped.
Remove and discard the rear axle assembly support rear bolts.
Torque: 148 lb.ft (200 Nm)
.jpg) |
-
Gently down the transmission jack and remove the rear axle assembly.
Use the General Equipment: Transmission Jack
.jpg) |
Installation
-
To install, reverse the removal procedure.
 General Procedures - Ring Gear Backlash Adjustment
Special Tool(s) /
General Equipment
205-220Installer, Differential ShimTKIT-1985-FH
Dial Indicator
Copper Hammer
Adjustment
Remove the differential housing cover...
 Removal and Installation - Axle Housing Bushing
Special Tool(s) /
General Equipment
205-1066Installer, Bushing
Flat Headed Screw Driver
Removal
NOTE:
Only worn or damaged bushings need to be replaced...
Other information:
Lincoln Aviator 2020-2026 Service Manual: Removal and Installation - Second Row Single Seat Backrest Cover
Special Tool(s) / General Equipment Interior Trim Remover Removal NOTE: LH (left hand) shown, RH (right hand) similar. Remove the second row seat. Refer to: Second Row Seat (501-10B Second Row Seats, Removal and Installation)...
Lincoln Aviator 2020-2026 Service Manual: Description and Operation - Supplemental Climate Control - System Operation and Component Description
System Diagram Item Description 1 SOBDMC 2 BCMC 3 PCM 4 Cabin Coolant Heater 5 Cabin heater coolant temperature sensor 6 Cabin heater coolant pump 7 Ambient Air Temperature (AAT) sensor 8 Engine Coolant Temperature (ECT) sensor Network Message Chart - Module Network Input Messages - SOBDMC Cabin Coolant Heater Broadcast Message Originating Module Message Purpose Engine Coolant Temperature Data PCM This message contains raw value from the engine coolant temperature sensor...
Categories
- Manuals Home
- Lincoln Aviator Owners Manual
- Lincoln Aviator Service Manual
- Drive Modes
- Resetting the System
- Body and Paint
- New on site
- Most important about car
Child Safety Locks
When the child safety locks are set, you cannot open the rear doors from the inside.
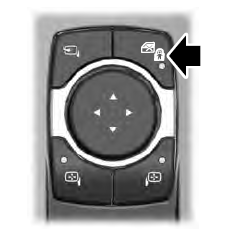
The child safety lock control is on the driver door.
Press the control to switch the child safety locks on. Press the control again to switch them off. A light on the child safety control illuminates when you switch them on.

Copyright © 2026 www.liaviator2.com