Lincoln Aviator 2020-2026 Service Manual / Body and Paint / Body and Paint / Interior Trim and Ornamentation / Removal and Installation - Rear Door Trim Panel
Lincoln Aviator: Interior Trim and Ornamentation / Removal and Installation - Rear Door Trim Panel
Special Tool(s) / General Equipment
| Interior Trim Remover |
Removal
NOTE: LH (left hand) shown, RH (right hand) similar.
NOTE: Removal steps in this procedure may contain installation details.
-
Remove the rear door window control switch.
Refer to: Rear Door Window Control Switch (501-11 Glass, Frames and Mechanisms, Removal and Installation).
-
Remove the rear door trim panel upper bolt.
Torque: 48 lb.in (5.4 Nm)
.jpg) |
-
Remove the rear door trim panel lower bolt.
Torque: 15 lb.in (1.7 Nm)
.jpg) |
-
Release the rear door trim panel clips.
Use the General Equipment: Interior Trim Remover
.jpg) |
-
Remove the rear door trim panel.
-
Lift upward and outward on the rear door trim panel.
-
Disconnect the interior rear door release switch electrical connector.
-
Disconnect the rear door tweeter speaker electrical connector.
-
If equipped.
Disconnect the rear door mid range speaker electrical connector.
-
Disconnect the interior ambient light electrical connector.
-
Lift upward and outward on the rear door trim panel.
.jpg) |
Installation
-
To install, reverse the removal procedure.
 Removal and Installation - Loadspace Trim Panel
Special Tool(s) /
General Equipment
Interior Trim Remover
Removal
NOTE:
LH shown, RH similar.
Remove the following items:
Remove the rear scuff plate trim panel...
 Removal and Installation - Rear Scuff Plate Trim Panel
Special Tool(s) /
General Equipment
Interior Trim Remover
Removal
NOTE:
LH (left hand) shown, RH (right hand) similar.
Release the clips and remove the rear scuff plate trim panel...
Other information:
Lincoln Aviator 2020-2026 Service Manual: Removal and Installation - Gear Shift Module (GSM)
Special Tool(s) / General Equipment Interior Trim Remover Removal NOTE: Removal steps in this procedure may contain installation details. NOTE: Move the front seats forward and rearward as necessary to access the floor console components...
Lincoln Aviator 2020-2026 Service Manual: Diagnosis and Testing - Instrument Panel and Interior Switches Illumination
Diagnostic Trouble Code (DTC) Chart Diagnostics in this manual assume a certain skill level and knowledge of Ford-specific diagnostic practices. REFER to: Diagnostic Methods (100-00 General Information, Description and Operation). Diagnostic Trouble Code Chart Module DTC Description Action BCM B1314:11 White Lighting (Reflective Controls) Illumination Output: Circuit Short To Ground GO to Pinpoint Test I BCM B1314:15 White Lighting (Reflective Controls) Illumination Output: Circuit Short To Battery or Open GO to Pinpoint Test I BCM B1315:11 Backlighting (Non Reflective Controls) Illumination Output: Circuit Short To Ground GO to Pinpoint Test C BCM B1315:15 Backlighting (Non Reflective Controls) Illumination Output: Circuit Short To Battery or Open GO to Pinpoint Test C DCME B1170:11 Back Light: Circuit Short To Ground GO to Pinpoint Test J DCMF B1170:11 Back Light: Circuit Short To Ground GO to Pinpoint Test J DCMG B1170:11 Back Light: Circuit Short To Ground GO to Pinpoint Test J DCMH B1170:11 Back Light: Circuit Short To Ground GO to Pinpoint Test J DDM B12FF:11 Rear Door Switch Illumination: Circuit Short To Ground GO to Pinpoint Test G DDM B12FF:15 Rear Door Switch Illumination: Circuit Short To Battery or Open GO to Pinpoint Test G DDM U2010:11 Switch Illumination: Circuit Short to Ground GO to Pinpoint Test E DDM U2010:15 Switch Illumination: Circuit Short To Battery or Open GO to Pinpoint Test E PDM B12FF:11 Rear Door Switch Illumination: Circuit Short To Ground GO to Pinpoint Test H PDM B12FF:15 Rear Door Switch Illumination: Circuit Short To Battery or Open GO to Pinpoint Test H PDM U2010:11 Switch Illumination: Circuit Short to Ground GO to Pinpoint Test F PDM U2010:15 Switch Illumination: Circuit Short To Battery or Open GO to Pinpoint Test F Symptom Chart Diagnostics in this manual assume a certain skill level and knowledge of Ford-specific diagnostic practices...
Categories
- Manuals Home
- Lincoln Aviator Owners Manual
- Lincoln Aviator Service Manual
- Configuring The Head Up Display
- Locking and Unlocking
- Resetting the System
- New on site
- Most important about car
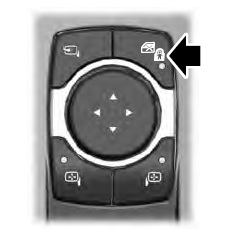
Child Safety Locks
When the child safety locks are set, you cannot open the rear doors from the inside.

The child safety lock control is on the driver door.
Press the control to switch the child safety locks on. Press the control again to switch them off. A light on the child safety control illuminates when you switch them on.
Copyright © 2026 www.liaviator2.com
