Lincoln Aviator: Steering Column / Removal and Installation - Steering Column
Removal
NOTICE: To prevent damage to the clockspring, make sure the front wheels are in the straight-ahead position.
NOTICE: Precise tolerances are required when manufacturing a steering column. Never install a repaired, rebuilt, aftermarket, or remanufactured steering column. Always install a new steering column. Failure to follow this direction can result in steering column failure.
NOTE: Removal steps in this procedure may contain installation details.
All vehicles
-
Depower the SRS.
Refer to: Supplemental Restraint System (SRS) Depowering (501-20B Supplemental Restraint System, General Procedures).
-
NOTE: This step is only necessary when installing a new component.
Remove the SCCM.
Refer to: Steering Column Control Module (SCCM) (211-05 Steering Wheel and Column Electrical Components, Removal and Installation).
-
NOTE: This step is only necessary when installing a new component.
Remove the steering column shrouds.
Refer to: Steering Column Shrouds (501-05 Interior Trim and Ornamentation, Removal and Installation).
-
NOTICE: Make sure that the steering wheel does not rotate or damage to the clockspring may occur.
Secure the steering wheel.
.jpg) |
-
Position aside the LH steering column opening panel.
.jpg) |
Vehicles with power adjustable steering column
-
-
Release the wiring harness retainers.
-
Disconnect the steering column tilt motor and telescopic motor electrical connectors.
-
Release the wiring harness retainers.
.jpg) |
All vehicles
-
Remove and discard the steering column shaft bolt and separate the steering column shaft from the steering column..jpg) WARNING:
Do not reuse steering column shaft bolts. This
may result in fastener failure and steering column shaft detachment or
loss of steering control. Failure to follow this instruction may result
in serious injury to vehicle occupant(s).
WARNING:
Do not reuse steering column shaft bolts. This
may result in fastener failure and steering column shaft detachment or
loss of steering control. Failure to follow this instruction may result
in serious injury to vehicle occupant(s).
Torque: 22 lb.ft (30 Nm)
.jpg) |
-
Remove and discard the rear steering column mounting nuts..jpg) WARNING:
Do not reuse steering column nuts. This may
result in fastener failure and steering column detachment or loss of
steering control. Failure to follow this instruction may result in
serious injury to vehicle occupant(s).
WARNING:
Do not reuse steering column nuts. This may
result in fastener failure and steering column detachment or loss of
steering control. Failure to follow this instruction may result in
serious injury to vehicle occupant(s).
Torque: 18 lb.ft (25 Nm)
.jpg) |
-
NOTE: Power adjustable column shown, others similar.
Remove and discard the forward steering column mounting nuts and remove the steering column.
.jpg) |
Installation
-
To install, reverse the removal procedure.
-
.jpg) WARNING:
Do not reuse steering column nuts. This may result
in fastener failure and steering column detachment or loss of steering
control. Failure to follow this instruction may result in serious injury
to vehicle occupant(s).
WARNING:
Do not reuse steering column nuts. This may result
in fastener failure and steering column detachment or loss of steering
control. Failure to follow this instruction may result in serious injury
to vehicle occupant(s).
NOTE: Power adjustable column shown, others similar.
Tighten the new steering column mounting nuts following the sequence shown.
Torque: 18 lb.ft (25 Nm)
.jpg) |
-
Repower the SRS.
Refer to: Supplemental Restraint System (SRS) Repowering (501-20B Supplemental Restraint System, General Procedures).
Vehicles with memory steering column
-
NOTE: This step is only necessary when installing a new component.
If a new memory steering column has been installed, use the steering column control switch and set the soft stops as follows.
-
Move the column rearward until it reaches the end of travel.
-
Move the column in the same direction until it reaches the end of travel again.
-
Move the column forward until it reaches the end of travel.
-
Move the column in the same direction until it reaches the end of travel again.
-
Repeat the sequence moving the column up and down.
-
Move the column rearward until it reaches the end of travel.
 General Procedures - Steering Wheel Cover Repair
Materials
Name
Specification
Motorcraft® Instant Gel AdhesiveTA-19-C
WSS-M2G401-B5
Repair
NOTE:
If re-adhering leather to the front side of the
steering wheel only, it will not be necessary to remove the steering
wheel...
 Removal and Installation - Steering Column Lower Shaft
Removal
NOTE:
Removal steps in this procedure may contain installation details.
NOTICE:
Do not allow the steering column to rotate while the
steering column shaft is disconnected or damage to the steering column
internal sensor may result...
Other information:
Lincoln Aviator 2020-2026 Service Manual: Removal and Installation - Front Driveshaft
Special Tool(s) / General Equipment Strap Wrench Transmission Jack Materials Name Specification Motorcraft® High Temperature 4x4 Front Axle and Wheel Bearing GreaseXG-11 WSS-M1C267-A1 Slip Yoke Grease5L3Z-19A506-A - Removal All vehicles Disconnect battery terminals...
Lincoln Aviator 2020-2026 Service Manual: Removal and Installation - Cruise Control Module (CCM)
Removal NOTE: Removal steps in this procedure may contain installation details. All vehicles NOTE: If installing a new CCM, it is necessary to upload the module configuration information to the scan tool prior to removing the module. This information must be downloaded into the new CCM after installation...
Categories
- Manuals Home
- Lincoln Aviator Owners Manual
- Lincoln Aviator Service Manual
- Changing the Front Wiper Blades - Vehicles With: Heated Wiper Blades
- Anti-Theft Alarm
- Fuel Quality
- New on site
- Most important about car
Fastening the Seatbelts
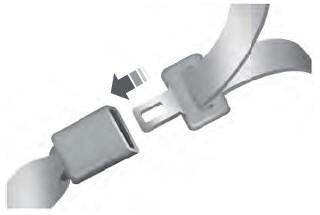
The front outboard and rear safety restraints in the vehicle are combination lap and shoulder belts.
Insert the belt tongue into the proper buckle (the buckle closest to the direction the tongue is coming from) until you hear a snap and feel it latch. Make sure that you securely fasten the tongue in the buckle.
