Lincoln Aviator: All-Wheel Drive / Driving in Special Conditions With All-Wheel Drive (AWD)
Note: Use of the AWD system in slippery, deep snow and sand drive modes on dry surfaces could produce some vibration and driveline bind up and, or excessive tire wear, as the intent of these drive modes are for slippery and loose surfaces.
Note: You can use AWD vehicles for driving on sand, snow, mud and rough roads and have operating characteristics that are somewhat different from conventional vehicles, both on and off the highway.
Basic Operating Principles in Special Conditions
- Drive slower in strong crosswinds which can affect the normal steering characteristics of your vehicle.
- Be extremely careful when driving on pavement made slippery by loose sand, water, gravel, snow or ice.
If Your Vehicle Goes Off the Edge of the Pavement
- If your vehicle goes off the edge of the pavement, slow down, but avoid severe brake application, ease the vehicle back onto the pavement only after reducing your speed. Do not turn the steering wheel too sharply while returning to the road surface.
- It could be safer to stay on the apron or shoulder of the road and slow down gradually before returning to the pavement. You could lose control if you do not slow down or if you turn the steering wheel too sharply or abruptly.
- It often could be less risky to strike small objects, such as highway reflectors, with minor damage to your vehicle rather than attempt a sudden return to the pavement which could cause the vehicle to slide sideways out of control or rollover. Remember, your safety and the safety of others should be your primary concern.
If Your Vehicle Gets Stuck
WARNING: Apply the parking brake, shift into park (P), switch the ignition off and remove the key before you leave your vehicle. Failure to follow this instruction could result in personal injury or death.
WARNING: If the parking brake is fully released, but the brake warning lamp remains illuminated, the brakes may not be working properly. Have your vehicle checked as soon as possible.
WARNING: Do not spin the wheels at over 34 mph (55 km/h). The tires may fail and injure a passenger or bystander.
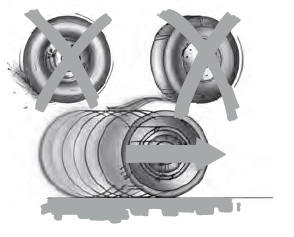
If your vehicle gets stuck in mud or snow it could be rocked out by shifting between forward and reverse gears, stopping between shifts, in a steady pattern. Press lightly on the accelerator in each gear.
If your vehicle is equipped with AdvanceTrac® with Roll Stability Control™, it could be beneficial to disengage the AdvanceTrac® with Roll Stability Control™ system while attempting to rock the vehicle.
Note: Do not rock the vehicle if the engine is not at normal operating temperature or damage to the transmission could occur.
Note: Do not rock the vehicle for more than a few minutes or damage to the transmission and tires could occur or the engine could overheat.
Emergency Maneuvers
- In an unavoidable emergency situation where a sudden sharp turn must be made, remember to avoid "over-driving" your vehicle (i.e., turn the steering wheel only as rapidly and as far as required to avoid the emergency). Excessive steering can result in less vehicle control, not more. Additionally, smooth variations of the accelerator and/or brake pedal pressure should be utilized if changes in vehicle speed are called for. Avoid abrupt steering, acceleration or braking which could result in an increased risk of loss of vehicle control, vehicle rollover and/or personal injury. Use all available road surface to return the vehicle to a safe direction of travel.
- In the event of an emergency stop, avoid skidding the tires and do not attempt any sharp steering wheel movements.
- If the vehicle goes from one type of surface to another (i.e., from concrete to gravel) there is a change in the way the vehicle responds to a maneuver (steering, acceleration or braking). Again, avoid these abrupt inputs.
Sand
When driving over sand, try to keep all four wheels on the most solid area of the trail. Avoid reducing the tire pressures but shift to a lower gear and drive steadily through the terrain. Apply the accelerator slowly and avoid spinning the wheels.
Avoid excessive speed because vehicle momentum can work against you and cause the vehicle to become stuck to the point that assistance could be required from another vehicle. Remember, you could be able to back out the way you came if you proceed with caution.
Mud and Water
If you must drive through high water, drive slowly. Traction or brake capability could be limited.
Note: Driving through deep water could damage your vehicle.
When driving through water, determine the depth; avoid water higher than the bottom of the hubs (if possible) and proceed slowly. If the ignition system gets wet, the vehicle could stall.
Once through water, always try the brakes. Wet brakes do not stop the vehicle as effectively as dry brakes. Drying can be improved by moving your vehicle slowly while applying light pressure on the brake pedal.
Be cautious of sudden changes in vehicle speed or direction when you are driving in mud. Even AWD vehicles can lose traction in slick mud. As when you are driving over sand, apply the accelerator slowly and avoid spinning your wheels. If the vehicle does slide, steer in the direction of the slide until you regain control of the vehicle.
After driving through mud, clean off residue stuck to rotating driveshafts and tires. Excess mud stuck on tires and rotating driveshafts causes an imbalance that could damage drive components.

“Tread Lightly” is an educational program designed to increase public awareness of land-use regulations and responsibilities in our nations wilderness areas. Ford Motor Company joins the U.S. Forest Service and the Bureau of Land Management in encouraging you to help preserve our national forest and other public and private lands by “treading lightly.”
Driving on Hilly or Sloping Terrain
Although natural obstacles could make it necessary to travel diagonally up or down a hill or steep incline, you should always try to drive straight up or straight down.
Note: Avoid driving crosswise or turning on steep slopes or hills. A danger lies in losing traction, slipping sideways and possibly rolling over. Whenever driving on a hill, determine beforehand the route you will use. Do not drive over the crest of a hill without seeing what conditions are on the other side. Do not drive in reverse over a hill without the aid of an observer.
When climbing a steep slope or hill, start in a lower gear rather than downshifting to a lower gear from a higher gear once the ascent has started. This reduces strain on the engine and the possibility of stalling.
If you do stall out, do not try to turn around because you might roll over. It is better to back down to a safe location.
Apply just enough power to the wheels to climb the hill. Too much power can cause the tires to slip, spin or lose traction, resulting in loss of vehicle control.

Descend a hill in the same gear you would use to climb up the hill to avoid excessive brake application and brake overheating. Do not descend in neutral; instead, disengage overdrive or manually shift to a lower gear. When descending a steep hill, avoid sudden hard braking as you could lose control. The front wheels have to be turning in order to steer the vehicle.
Your vehicle has anti-lock brakes, therefore apply the brakes steadily. Do not “pump” the brakes.
 How Your Vehicle Differs from Other Vehicles
Truck and utility vehicles can differ from
some other vehicles. Your vehicle could be
higher to allow it to travel over rough terrain
without getting hung up or damaging
underbody components...
 Driving on Snow and Ice
WARNING: If you are driving in
slippery conditions that require tire chains
or cables, then it is critical that you drive
cautiously. Keep speeds down, allow for
longer stopping distances and avoid
aggressive steering to reduce the chances
of a loss of vehicle control which can lead
to serious injury or death...
Other information:
Lincoln Aviator 2020-2026 Service Manual: Diagnosis and Testing - Road Testing Vehicle
Shift Point Road Test NOTE: Always drive the vehicle in a safe manner according to driving conditions and obey all traffic laws. Upshift Gear Sequence At times the 10-speed transmission may skip gears when the vehicle starts from a complete stop...
Lincoln Aviator 2020-2026 Owners Manual: Traction Control
Principle of Operation The traction control system helps avoid drive wheel spin and loss of traction. If your vehicle begins to slide, the system applies the brakes to individual wheels and, when needed, reduces engine power at the same time. If the wheels spin when accelerating on slippery or loose surfaces, the system reduces engine power in order to increase traction...
Categories
- Manuals Home
- Lincoln Aviator Owners Manual
- Lincoln Aviator Service Manual
- Resetting the System
- Fuel Quality
- Disabling Auto-Start-Stop
- New on site
- Most important about car
Emergency Locking
Each door has a backup power system which allows the door to function if your vehicle has no power. The system has a limited number of operations before the power is depleted and turns off. When the system turns off, the door remains open and unlatched and does not close.
If your vehicle has no power and the backup power system is turned off, you can close and secure your vehicle by manually resetting each door latch using a key in the position shown.
