Lincoln Aviator: Roadside Emergencies / Jump Starting the Vehicle
WARNING: Batteries normally produce explosive gases which can cause personal injury. Therefore, do not allow flames, sparks or lighted substances to come near the battery. When working near the battery, always shield your face and protect your eyes. Always provide correct ventilation.
WARNING: Keep batteries out of reach of children. Batteries contain sulfuric acid. Avoid contact with skin, eyes or clothing. Shield your eyes when working near the battery to protect against possible splashing of acid solution. In case of acid contact with skin or eyes, flush immediately with water for a minimum of 15 minutes and get prompt medical attention. If acid is swallowed, call a physician immediately.
WARNING: Use only adequately sized cables with insulated clamps.
Preparing Your Vehicle
Do not attempt to push-start your automatic transmission vehicle.
Note: Attempting to push-start a vehicle with an automatic transmission may cause transmission damage.
Note: Use only a 12-volt supply to start your vehicle.
Note: Do not disconnect the battery of the disabled vehicle as this could damage the vehicle electrical system.
Park the booster vehicle close to the hood of the disabled vehicle, making sure the two vehicles do not touch.
Locating the Jump Starting Connection Points
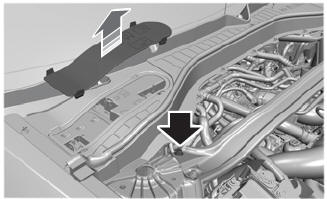
- Open the hood.
- Remove the access cover.
- Remove the red protective cover from the positive lead jump connection point.
- Locate the negative jump connection point on the rear mounting bolt for the cross brace, as shown.
Connecting the Jumper Cables
WARNING: If the engine is running while the hood is open, stay clear of moving engine components. Failure to follow this warning could result in serious personal injury or death.
WARNING: Do not connect the negative jumper cable to any other part of your vehicle. Use the ground point.
Note: In the illustration, the bottom vehicle represents the booster vehicle.
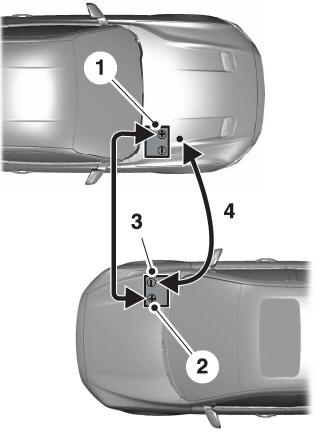
- Connect the positive (+) jumper cable to the positive (+) terminal of the discharged battery.
- Connect the other end of the positive (+) cable to the positive (+) terminal of the booster vehicle battery
- Connect the negative (-) cable to the negative (-) terminal of the booster vehicle battery.
- Make the final connection of the negative (-) cable to an exposed metal part of the stalled vehicle's engine, away from the battery and the fuel injection system, or connect the negative (-) cable to a ground connection point if available.
Jump Starting
Note: If you are using a hybrid vehicle as the booster vehicle, you do not need to rev the engine.
- Start the engine of the booster vehicle and rev the engine moderately, or press the accelerator gently to keep your engine speed between 2000 and 3000 RPM, as shown in your tachometer.
- Start the engine of the disabled vehicle.
- Once the disabled vehicle has been started, run both vehicle engines for an additional three minutes before disconnecting the jumper cables.
Removing the Jumper Cables
Remove the jumper cables in the reverse order that they were connected.
- Remove the negative (-) jumper cable from the disabled vehicle.
- Remove the jumper cable on the negative (-) terminal of the booster vehicle battery.
- Remove the jumper cable from the positive (+) terminal of the booster vehicle battery.
- Remove the jumper cable from the positive (+) terminal of the disabled vehicle battery.
- Allow the engine to idle for at least one minute.
 Fuel Shutoff
WARNING: If your vehicle has been
involved in a crash, have the fuel system
checked. Failure to follow this instruction
could result in fire, personal injury or death...
 Collision, Damage or Fire Event
Guidance for Ford Motor Company Electric and Hybrid-Electric Vehicles
Equipped With High Voltage Batteries
(Vehicle Owner/Operator/General Public) Electric and Hybrid-Electric
Vehicle Considerations
In the event of damage or fire involving an
electric vehicle or hybrid-electric vehicle:
Always assume the high-voltage battery
and associated components are
energized and fully charged...
Other information:
Lincoln Aviator 2020-2026 Service Manual: General Procedures - Headlamp Adjustment
Adjustment NOTE: If the flash video link does not load or is incompatible with your browser, a .wmv version of the video can be accessed at: http://www.fordservicecontent.com/Ford_Content/videos/FusionHeadlampAdj2.wmv Click on the link above to view video...
Lincoln Aviator 2020-2026 Service Manual: Removal and Installation - Cellular Antenna Cable
Removal NOTE: Removal steps in this procedure may contain installation details. All vehicles Lower the headliner. Refer to: Headliner - Lowering (501-05 Interior Trim and Ornamentation, Removal and Installation). Remove the LH loadspace trim panel...
Categories
- Manuals Home
- Lincoln Aviator Owners Manual
- Lincoln Aviator Service Manual
- Configuring The Head Up Display
- Keyless Entry
- Locking and Unlocking
- New on site
- Most important about car
Children and Airbags
WARNING: Airbags can kill or injure a child in a child restraint. Never place a rear-facing child restraint in front of an active airbag. If you must use a forward-facing child restraint in the front seat, move the seat upon which the child restraint is installed all the way back.
