
Lincoln Aviator 2020-2026 Service Manual / Electrical / Climate Control System / Climate Control System - General Information / Removal and Installation - Evaporator
Lincoln Aviator: Climate Control System - General Information / Removal and Installation - Evaporator
Removal
NOTE: Removal steps in this procedure may contain installation details.
-
Remove the climate control housing.
Refer to: Climate Control Housing (412-00 Climate Control System - General Information, Removal and Installation).
-
Remove the screws and the thermostatic expansion valve
Torque: 71 lb.in (8 Nm)
.jpg) |
-
Remove the climate control housing seal.
.jpg) |
-
Remove the screws, release the tab and remove the evaporator tube cover.
.jpg) |
-
Remove the heater tube dash panel seal, the screws and the heater tube bracket.
.jpg) |
-
Remove the screws, release the tabs and remove the evaporator cover.
.jpg) |
-
Remove the evaporator core form the climate control housing.
.jpg) |
-
Remove the evaporator core temperature sensor from the evaporator core.
.jpg) |
Installation
-
To install, reverse the removal procedure.
 Removal and Installation - Driver Side Register Air Discharge Temperature Sensor
Special Tool(s) /
General Equipment
Interior Trim Remover
Removal
Release the clips and remove the insutment panel speaker grille...
 Removal and Installation - Evaporator Temperature Sensor
Removal
NOTE:
The evaporator temperature sensor is available only as part of the evaporator.
Remove the evaporator.
Refer to: Evaporator (412-00 Climate Control System - General Information, Removal and Installation)...
Other information:
Lincoln Aviator 2020-2026 Owners Manual: What Is Drive Mode Control
The system delivers a driving experience through a suite of sophisticated electronic vehicle systems. These systems optimize steering, handling and powertrain response. This provides a single location to control multiple systems performance settings...
Lincoln Aviator 2020-2026 Service Manual: Removal and Installation - Front Controls Interface Module B (FCIMB)
Removal NOTE: Removal steps in this procedure may contain installation details. NOTE: If installing a new module, it is necessary to upload the module configuration information to the scan tool prior to removing the module. This information must be downloaded into the new module after installation...
Categories
- Manuals Home
- Lincoln Aviator Owners Manual
- Lincoln Aviator Service Manual
- Description and Operation - Body and Frame
- Opening and Closing the Hood
- Disabling Auto-Start-Stop
- New on site
- Most important about car
Fastening the Seatbelts
The front outboard and rear safety restraints in the vehicle are combination lap and shoulder belts.
Insert the belt tongue into the proper buckle (the buckle closest to the direction the tongue is coming from) until you hear a snap and feel it latch. Make sure that you securely fasten the tongue in the buckle.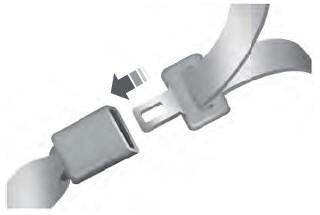

Copyright © 2026 www.liaviator2.com