Lincoln Aviator 2020-2026 Service Manual / Body and Paint / Body and Paint / Body Closures / Removal and Installation - Liftgate
Lincoln Aviator: Body Closures / Removal and Installation - Liftgate
Removal
NOTE: Removal steps in this procedure may contain installation details.
-
Remove the liftgate trim panel.
Refer to: Liftgate Trim Panel (501-05 Interior Trim and Ornamentation, Removal and Installation).
-
Lower the headliner.
Refer to: Headliner - Lowering (501-05 Interior Trim and Ornamentation, Removal and Installation).
-
-
Remove the bolt.
Torque: 106 lb.in (12 Nm)
-
Disconnect the liftgate electrical connectors.
-
Disconnect the liftgate harness routing clips.
-
Remove the bolt.
.jpg) |
-
Disconnect the rear washer hose.
.jpg) |
-
Remove the grommet and route the harness out of the liftgate.
.jpg) |
-
Mark the location of the liftgate hinge bolts.
.jpg) |
-
NOTE: This step requires the aid of another technician.
On both sides.
Remove the clips holding the liftgate struts or the power liftgate motor and position aside.
.jpg) |
-
NOTE: This step requires the aid of another technician.
Remove the liftgate bolts and remove the liftgate from the vehicle.
Torque: 22 lb.ft (30 Nm)
.jpg) |
Installation
-
To install, reverse the removal procedure.
-
Align the liftgate as necessary.
Refer to: Liftgate Alignment (501-03 Body Closures, General Procedures).
Vehicles with power liftgate
-
Carry-out the power liftgate initialization.
Refer to: Power Liftgate Initialization (501-03 Body Closures, General Procedures).
 Removal and Installation - Hands-Free Liftgate Actuation Upper Sensor
Removal
NOTE:
Removal steps in this procedure may contain installation details.
Remove the rear bumper cover.
Refer to: Rear Bumper Cover (501-19 Bumpers, Removal and Installation)...
 Removal and Installation - Liftgate Anti-Pinch Switch
Removal
NOTE:
Removal steps in this procedure may contain installation details.
NOTE:
LH side shown, RH side similar.
Remove the liftgate trim panel...
Other information:
Lincoln Aviator 2020-2026 Service Manual: Description and Operation - Head Up Display (HUD) - Overview
Overview The HUD provides two major purposes. It serves as a supplemental display for driver information and provides the forward collison warning to alert the driver of an impending collision. All HUD information and warnings are displayed on the windshield and can be turned on, off and setup to display individual features using the RH steering wheel switch...
Lincoln Aviator 2020-2026 Service Manual: General Procedures - Bezel Diagnostics
Check NOTE: If there is a concern with one of the following components and Bezel Diagnostics cannot be accessed, obtain the module part number by referencing the label attached to the module. Inoperative ACM Inoperative (blank or does not power on) display unit (non-touchscreen display or touchscreen display) Inoperative FCIM or radio control panel Inoperative steering wheel switch Refer to appropriate 415-00 section to diagnose the inoperative component...
Categories
- Manuals Home
- Lincoln Aviator Owners Manual
- Lincoln Aviator Service Manual
- Resetting the System
- Keyless Entry
- Locking and Unlocking
- New on site
- Most important about car
Fastening the Seatbelts
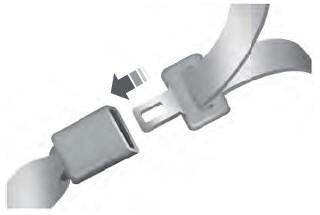
The front outboard and rear safety restraints in the vehicle are combination lap and shoulder belts.
Insert the belt tongue into the proper buckle (the buckle closest to the direction the tongue is coming from) until you hear a snap and feel it latch. Make sure that you securely fasten the tongue in the buckle.
Copyright © 2026 www.liaviator2.com
