Lincoln Aviator 2020-2026 Service Manual / Electrical / Lighting / Exterior Lighting / Removal and Installation - Rear Lamp Assembly
Lincoln Aviator: Exterior Lighting / Removal and Installation - Rear Lamp Assembly
Removal
NOTE: Removal steps in this procedure may contain installation details.
NOTE: LH lamp assembly shown, RH lamp assembly is similar.
-
Remove the rear bumper cover.
Refer to: Rear Bumper Cover (501-19 Bumpers, Removal and Installation).
-
Remove the loadspace trim panel.
Refer to: Loadspace Trim Panel (501-05 Interior Trim and Ornamentation, Removal and Installation).
-
Remove the rear lamp assembly side screw.
Torque: 22 lb.in (2.5 Nm)
.jpg) |
-
Disconnect the rear lamp assembly electrical connector.
.jpg) |
-
Position the rear lamp assembly.
-
Remove the rear lamp assembly screws.
Torque: 17 lb.in (1.9 Nm)
-
Using a non-marring tool, release the rear lamp assembly retainer pin outward.
-
Gently pull the rear lamp assembly away from the vehicle.
-
Remove the rear lamp assembly screws.
.jpg) |
-
Detach the rubber grommet and remove the rear lamp assembly.
.jpg) |
Installation
-
To install, reverse the removal procedure.
 Removal and Installation - Light Sensor
Removal
NOTE:
Removal steps in this procedure may contain installation details.
Using a non-marring tool release and position the light sensor...
 Removal and Installation - Reversing Lamp
Removal
NOTE:
Removal steps in this procedure may contain installation details.
Remove the liftgate trim panel.
Refer to: Liftgate Trim Panel (501-05 Interior Trim and Ornamentation, Removal and Installation)...
Other information:
Lincoln Aviator 2020-2026 Owners Manual: Apps
The system allows you interact with select mobile apps while keeping your eyes on the road. Voice commands, your steering wheel buttons, or a quick tap on your touchscreen give you advanced control of compatible mobile apps. You can also stream your favorite music or podcasts, share your time of arrival with friends, and keep connected safely...
Lincoln Aviator 2020-2026 Owners Manual: Air Suspension
WARNING: If your vehicle has self-leveling air suspension, you must switch the system off before carrying out any maintenance or repair. Failure to follow this warning could result in serious personal injury or death. The air suspension system automatically adjusts to maintain a constant frame height, allows for ease of vehicle loading, provides improved vehicle ride, and increased driver comfort...
Categories
- Manuals Home
- Lincoln Aviator Owners Manual
- Lincoln Aviator Service Manual
- Tire Change Procedure
- Description and Operation - Jacking and Lifting
- Wireless Accessory Charger (If Equipped)
- New on site
- Most important about car
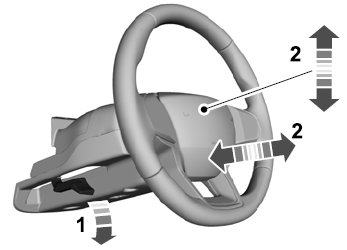
Adjusting the Steering Wheel - Vehicles With: Manual Adjustable Steering Column
WARNING: Do not adjust the steering wheel when your vehicle is moving.
Note: Make sure that you are sitting in the correct position.
Unlock the steering column. Adjust the steering wheel to the desired position.
Copyright © 2026 www.liaviator2.com
