Lincoln Aviator: Roof Opening Panel / General Procedures - Power Roof Opening Panel Initialization
Initialization
.jpg) WARNING:
Keep objects and body parts clear of the glass panel when
carrying out the initialization procedure. During the initialization
procedure, the glass panel closes with high force and cannot detect
objects in its path. Failure to follow this instruction may result in
serious personal injury.
WARNING:
Keep objects and body parts clear of the glass panel when
carrying out the initialization procedure. During the initialization
procedure, the glass panel closes with high force and cannot detect
objects in its path. Failure to follow this instruction may result in
serious personal injury.
NOTE: The roof opening panel motors must be initialized when repairs are carried out on the MoonRoof, including any time the roof opening panel motors have been removed, the roof opening glass or shield (shade) has been removed or adjusted, or the roof opening frame has been serviced.
NOTE: Carrying out the procedure below will initialize both the roof opening panel glass and the roof opening panel shield (sunshade) motor.
NOTE: For new roof opening panel motors, one-touch open and one-touch close functions are disabled until the initialization procedure has been completed. For initialization of existing roof opening panel motors, skip to Step 5 below.
NOTE: Procedure for Initialization of new roof opening panel motors.
-
To initialize new (replaced) roof opening panel motors,
switch IGNITION to ON and leave it ON for the remainder of the
procedure.
-
Press and hold the glass close switch; the roof opening
glass will hit the front hard stop and reverse slightly to FULL CLOSE,
then the shade will do the same.
-
Release the switch, then press and hold it again; the
Shade will move to FULL OPEN, the glass will move to FULL OPEN then back
to FULL CLOSE, and the shade will move to FULL CLOSE. (additionally,
the shade might move to MID POSITION)
NOTE: Before operating the MoonRoof, switch the IGNITION to OFF, wait 10-15 seconds, then switch it back ON. The MoonRoof will then be ready for use.
-
Verify successful initialization by performing one-touch open and one-touch close operations.
NOTE: Re-initialization with existing (not replaced) roof opening panel motors.
-
To initialize existing roof opening panel motors, switch
IGNITION to ON then move the glass to FULL CLOSE and the shade to FULL
OPEN.
-
Switch IGNITION from ON to OFF then back to ON.
-
Press and hold the Shade Open switch for approximately 15 seconds.
-
Verify that the Glass Open, Shade Close, and Shade Open switches do not operate the MoonRoof.
-
Now the system is de-initialized and ready for re-initialization.
-
Press and hold the Glass Close switch, the glass will
hit the front hard stop and move to FULL CLOSE, then the shade will do
the same.
-
Release the switch, then press and hold it again; the
shade will move to FULL OPEN, the glass will move to FULL OPEN then back
to FULL CLOSE, the shade will move to FULL CLOSE. (additionally, the
shade might move to MID POSITION)
NOTE: Before operating the MoonRoof, switch the IGNITION to OFF, wait 10-15 seconds, then switch it back ON. The MoonRoof will then be ready for use.
-
Verify successful initialization by performing one-touch open and one-touch close operations.
 Diagnosis and Testing - Roof Opening Panel
DTC Chart: Roof Opening Panel
Diagnostics in this manual assume a certain skill level and knowledge of Ford-specific diagnostic practices. REFER to: Diagnostic Methods (100-00 General Information, Description and Operation)...
 General Procedures - Roof Opening Panel Alignment
Adjustment
NOTE:
Rear Fixed Glass Panel
NOTE:
If the rear fixed glass is in need of adjustment, align the
rear fixed glass panel and then align the front sliding glass panel...
Other information:
Lincoln Aviator 2020-2026 Service Manual: Description and Operation - Parking Brake - Overview
Overview The parking brake system uses 2 switch activated, Electronic Control Unit (ECU) controlled motors to apply and release the rear brake calipers. The ABS module controls and monitors the parking brake system and sets Diagnostic Trouble Codes (DTCs) when a fault is present in the system...
Lincoln Aviator 2020-2026 Owners Manual: General Information
Have your vehicle serviced regularly to help maintain its roadworthiness and resale value. There is a large network of authorized dealers that are there to help you with their professional servicing expertise. We believe that their specially trained technicians are best qualified to service your vehicle properly and expertly...
Categories
- Manuals Home
- Lincoln Aviator Owners Manual
- Lincoln Aviator Service Manual
- Garage Door Opener
- Body and Paint
- Keyless Entry
- New on site
- Most important about car
Child Seats

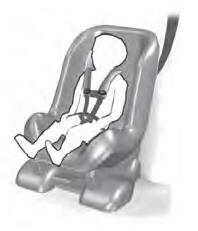
Use a child restraint (sometimes called an infant carrier, convertible seat, or toddler seat) for infants, toddlers and children weighing 40 lb (18 kg) or less (generally four-years-old or younger).
Using Lap and Shoulder Belts
WARNING: Do not place a rearward facing child restraint in front of an active airbag. Failure to follow this instruction could result in personal injury or death.
