Lincoln Aviator 2020-2026 Service Manual / Body and Paint / Body and Paint / Glass, Frames and Mechanisms / Removal and Installation - Front Door Window Glass
Lincoln Aviator: Glass, Frames and Mechanisms / Removal and Installation - Front Door Window Glass
Removal
NOTE: LH (left-hand) side shown, RH (right-hand) side similar.
-
Remove the front door window regulator and motor.
Refer to: Front Door Window Regulator and Motor (501-11 Glass, Frames and Mechanisms, Removal and Installation).
-
Lower the front door glass to the full down position.
-
Remove the tape.
-
Lower the front door glass to the full down position.
-
Remove the tape.
.jpg) |
-
Remove the front door upper trim.
-
Remove the pin-type retainer.
-
Remove the pin-type retainer and release the front door upper trim.
-
Release the front door upper trim.
-
Release the front door upper trim.
-
Remove the front door upper trim.
-
Remove the pin-type retainer.
.jpg) |
-
Remove the front door inner belt moulding.
.jpg) |
-
Remove the front door glass.
.jpg) |
Installation
-
To install, reverse the removal procedure.
-
Carry out the power door window initialization.
Refer to: Power Door Window Initialization (501-11 Glass, Frames and Mechanisms, General Procedures).
 Removal and Installation - Front Door Glass Top Run
Removal
NOTE:
LH (left-hand) side shown, RH (right-hand) side similar.
NOTE:
Removal steps in this procedure may contain installation details.
Remove the front door window glass...
 Removal and Installation - Front Door Window Regulator and Motor
Special Tool(s) /
General Equipment
Punch
Removal
NOTE:
Left hand (LH) shown, right hand (RH) similar.
NOTE:
For front door window regulator motors that are
non-functional it will be necessary to remove the front door window
regulator motor prior to removing the front door window regulator...
Other information:
Lincoln Aviator 2020-2026 Owners Manual: General Information
WARNING: This battery pack should only be serviced by an authorized electric vehicle technician. Improper handling can result in personal injury or death. WARNING: Apply the parking brake, shift into park (P), switch the ignition off and remove the key before you open the hood or have any service or repair work completed...
Lincoln Aviator 2020-2026 Service Manual: Removal and Installation - Exhaust Flexible Pipe
Removal NOTE: The LH and RH exhaust flexible pipes are covered in this procedure. Remove the exhaust flexible pipe(s) necessary. NOTE: Removal steps in this procedure may contain installation details. With the vehicle in NEUTRAL, position it on a hoist...
Categories
- Manuals Home
- Lincoln Aviator Owners Manual
- Lincoln Aviator Service Manual
- Changing the Front Wiper Blades - Vehicles With: Heated Wiper Blades
- Keyless Entry
- Anti-Theft Alarm
- New on site
- Most important about car
Fastening the Seatbelts
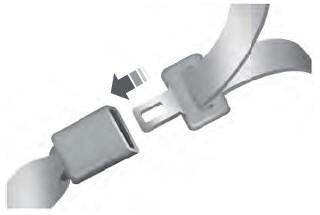
The front outboard and rear safety restraints in the vehicle are combination lap and shoulder belts.
Insert the belt tongue into the proper buckle (the buckle closest to the direction the tongue is coming from) until you hear a snap and feel it latch. Make sure that you securely fasten the tongue in the buckle.
Copyright © 2026 www.liaviator2.com
