Lincoln Aviator 2020-2024 Service Manual / Body and Paint / Body and Paint / Front Seats / Removal and Installation - Front Seat Cushion Cover - Vehicles Without: Multi-Contour Seats
Lincoln Aviator: Front Seats / Removal and Installation - Front Seat Cushion Cover - Vehicles Without: Multi-Contour Seats
Removal
Passenger seat
-
Remove the OCS.
Refer to: Occupant Classification System (OCS) Sensor - Vehicles Without: Multi-Contour Seats (501-20B Supplemental Restraint System, Removal and Installation).
Driver seat
-
Remove the front seat.
Refer to: Front Seat (501-10A Front Seats, Removal and Installation).
-
If equipped with heated/ventilated seats.
Remove the front seat cushion blower motor.
Refer to: Front Seat Cushion Blower Motor (501-10A Front Seats, Removal and Installation).
-
-
Detach the front seat cushion heater mat wiring harness retainer.
-
Detach the side airbag electrical connector.
-
Release the front seat backrest panel straps.
-
Detach the front seat cushion heater mat wiring harness retainer.
.jpg) |
-
-
Detach the front seat electrical connectors.
-
Detach the front seat wiring harness retainers.
-
Disconnect the front seat cushion heater mat electrical connector.
-
Detach the front seat electrical connectors.
.jpg) |
-
Detach the front seat cushion cover J-clips.
.jpg) |
-
Remove the front seat side shield screws.
.jpg) |
-
Remove the front seat LH side shield.
-
Lift up and out, separating the side shield from the recliner bracket.
-
Slide the side shield forward and separate the side shield from the seat.
-
Lift up and out, separating the side shield from the recliner bracket.
.jpg) |
-
Remove the front seat RH side shield.
-
Lift up and out, separating the side shield from the recliner bracket.
-
Slide the side shield forward and separate the side shield from the seat.
-
Lift up and out, separating the side shield from the recliner bracket.
.jpg) |
-
Remove the screws and the front seat valance.
.jpg) |
-
Remove the front seat cushion cover and foam as an assembly.
-
Detach the cushion cover J-clip.
-
On both sides.
Detach the cushion cover J-clips.
-
Detach the cushion cover J-clip.
.jpg) |
All seats
-
NOTE: This step is only necessary when installing a new component.
Position the rear portion of the seat cushion cover from the foam.
.jpg) |
-
NOTICE: Use care when separating the seat cushion from the hook-and-arrow or the hook may be torn from the seat cushion foam pad.
NOTICE: Use care when separating the seat cushion cover from the hook-and-loop strips or the hook-and-loop strips may be torn from the seat cushion foam.
NOTE: This step is only necessary when installing a new component.
Remove the front seat cushion cover.
-
Invert the seat cushion cover.
-
Release the hook and arrows.
-
Release the hook-and-loop strip.
-
Invert the seat cushion cover.
.jpg) |
Installation
-
To install, reverse the removal procedure.
 Removal and Installation - Front Seat Cushion Blower Motor
Removal
NOTE:
Driver seat with power head restraint shown, other seats similar.
Move the front seat to the full upward and forward position...
 Removal and Installation - Front Seat Cushion Cover - Vehicles With: Multi-Contour Seats
Removal
Passenger seat
Remove the OCS.
Refer to: Occupant Classification System (OCS) Sensor - Vehicles With: Multi-Contour Seats (501-20B Supplemental Restraint System, Removal and Installation)...
Other information:
Lincoln Aviator 2020-2024 Service Manual: General Procedures - Evaporator Core Leak Check - Vehicles With: R134A Refrigerant
Special Tool(s) / General Equipment Air Conditioning Service Unit Air Conditioning Adaptor Kit Inspection Recover the refrigerant. Refer to Air Conditioning (A/C) System Recovery, Evacuation and Charging procedure in Group 412...
Lincoln Aviator 2020-2024 Service Manual: Removal and Installation - Steering Gear Boot
Special Tool(s) / General Equipment Boot Clamp Pliers Materials Name Specification Motorcraft® Premium Long-Life GreaseXG-1-E1 ESA-M1C75-B Removal NOTICE: The steering gear boots and clamps are designed to provide an airtight seal and protect the internal components of the steering gear...
Categories
- Manuals Home
- Lincoln Aviator Owners Manual
- Lincoln Aviator Service Manual
- Resetting the System
- USB Port and Power Point Locations
- Garage Door Opener
- New on site
- Most important about car
Fastening the Seatbelts
The front outboard and rear safety restraints in the vehicle are combination lap and shoulder belts.
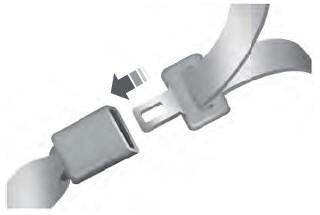
Insert the belt tongue into the proper buckle (the buckle closest to the direction the tongue is coming from) until you hear a snap and feel it latch. Make sure that you securely fasten the tongue in the buckle.
Copyright © 2024 www.liaviator2.com
