
Lincoln Aviator 2020-2026 Service Manual / Powertrain / Automatic Transmission / Automatic Transmission External Controls - 10-Speed Automatic Transmission – 10R60 / Removal and Installation - Gear Shift Module (GSM)
Lincoln Aviator: Automatic Transmission External Controls - 10-Speed Automatic Transmission – 10R60 / Removal and Installation - Gear Shift Module (GSM)
Special Tool(s) / General Equipment
| Interior Trim Remover |
Removal
NOTE: Removal steps in this procedure may contain installation details.
NOTE: Move the front seats forward and rearward as necessary to access the floor console components.
-
Remove the bolt cover and bolt. Release the clips and remove the LH floor console side panel extension.
.jpg) |
-
Release the retainers and remove the LH floor console side trim panel.
Use the General Equipment: Interior Trim Remover
.jpg) |
-
Release the retainers and remove the RH floor console side trim panel.
Use the General Equipment: Interior Trim Remover
.jpg) |
-
Position the carpet aside.
.jpg) |
-
Disconnect the electrical connectors.
.jpg) |
-
Remove the RH floor console bolts.
-
Torque: 44 lb.in (5 Nm)
-
.jpg) |
-
Position the carpet aside.
.jpg) |
-
Disconnect the electrical connectors.
.jpg) |
-
Remove the LH bolts and position the floor console rearward.
-
Torque: 44 lb.in (5 Nm)
-
.jpg) |
-
Release the clips and remove the instrument panel finish panel.
Use the General Equipment: Interior Trim Remover
.jpg) |
.jpg) |
-
Remove the bolts, pull out the GSM, disconnect the electrical connector and remove the GSM.
Torque: 44 lb.in (5 Nm)
.jpg) |
Installation
-
To install, reverse the removal procedure.
 Removal and Installation - Downshift Paddle Switch
Removal
NOTE:
Removal steps in this procedure may contain installation details.
Remove the steering wheel.
Refer to: Steering Wheel (211-04 Steering Column, Removal and Installation)...
 Removal and Installation - Transmission Park Manual Release Cable
Removal
NOTE:
Removal steps in this procedure may contain installation details.
With the vehicle in N, position it on a hoist.
Refer to: Jacking and Lifting (100-02 Jacking and Lifting, Description and Operation)...
Other information:
Lincoln Aviator 2020-2026 Service Manual: Diagnosis and Testing - Steering Wheel and Column Electrical Components
Diagnostic Trouble Code (DTC) Chart Diagnostics in this manual assume a certain skill level and knowledge of Ford-specific diagnostic practices. REFER to: Diagnostic Methods (100-00 General Information, Description and Operation). Diagnostic Trouble Code Chart Module DTC Description Action BCM B108A:01 Start Button: General Electrical Failure GO to Pinpoint Test A BCM B108A:24 Start Button: Signal Stuck High GO to Pinpoint Test A BCM B1142:29 Ignition Status 1: Signal Invalid GO to Pinpoint Test A BCM B1240:11 Start Button Mode Indicator: Circuit Short to Ground GO to Pinpoint Test B BCM B1240:15 Start Button Mode Indicator: Circuit Short to Battery or Open GO to Pinpoint Test C BCM B1310:12 Run/Start Control: Circuit Short to Battery GO to Pinpoint Test A BCM B1310:14 Run/Start Control: Circuit Short to Ground or Open GO to Pinpoint Test A SCCM B112B:04 SCCM:Steering Wheel Module: System Internal Failure GO to Pinpoint Test I SCCM B112B:44 SCCM:Steering Wheel Module: Data Memory Failure GO to Pinpoint Test I SCCM B112B:45 SCCM:Steering Wheel Module: Program Memory Failure GO to Pinpoint Test I SCCM B112B:46 SCCM:Steering Wheel Module: Calibration / Parameter Memory Failure GO to Pinpoint Test I SCCM B112B:49 SCCM:Steering Wheel Module: Internal Electronic Failure GO to Pinpoint Test I SCCM B135C:11 Heater Element:Circuit Short To Ground GO to Pinpoint Test G SCCM B135C:13 Heater Element:Circuit Open GO to Pinpoint Test G SCCM U0140:00 Lost Communication With Body Control Module: No Sub Type Information GO to Pinpoint Test H SCCM U0140:00 SCCM:Lost Communication With Body Control Module: No Sub Type Information GO to Pinpoint Test J SCCM U0146:00 SCCM:Lost Communication With Gateway "A": No Sub Type Information GO to Pinpoint Test J SCCM U0146:87 SCCM:Lost Communication With Gateway "A": No Sub Type Information GO to Pinpoint Test J SCCM U0155:00 SCCM:Lost Communication With Instrument Panel Cluster Module: No Sub Type Information GO to Pinpoint Test J SCCM U023A:00 SCCM:Lost Communication With Image Processing Module "A": No Sub Type Information GO to Pinpoint Test J SCCM U0241:00 SCCM:Lost Communication With Headlamp Control Module: No Sub Type Information GO to Pinpoint Test J SCCM U210A:11 Temperature Sensor:Circuit Short To Ground GO to Pinpoint Test G SCCM U210A:13 Temperature Sensor:Circuit Open GO to Pinpoint Test G SCCM U3003:A2 Battery Voltage: System Voltage Low GO to Pinpoint Test E SCCM U3003:A3 Battery Voltage:System Voltage High GO to Pinpoint Test F SECM B135C:11 Heater Element:Circuit Short To Ground GO to Pinpoint Test K SECM B135C:15 Heater Element:Circuit Short to Battery or Open GO to Pinpoint Test K SECM B13BD:92 Steering Wheel Heater Module:Performance or Incorrect Operation GO to Pinpoint Test K SECM U1000:00 Solid State Driver Protection Active:No Sub Type Information GO to Pinpoint Test K SECM U210A:02 Temperature Sensor:General Signal Failure GO to Pinpoint Test K SECM U210A:11 Temperature Sensor:Circuit Short to Ground GO to Pinpoint Test K SECM U210A:15 Temperature Sensor:Circuit Short to Battery or Open GO to Pinpoint Test K SIMA U0100:00 Lost Communication With ECM/PCM "A": No Sub Type Information GO to Pinpoint Test L SIMA U0140:00 Lost Communication With Body Control Module: No Sub Type Information GO to Pinpoint Test L SIMA U3003:16 Battery Voltage:Battery Voltage Below Threshold GO to Pinpoint Test M SIMA U3003:17 Battery Voltage:Battery Voltage Above Threshold GO to Pinpoint Test N Symptom Charts Symptom Chart: Ignition Switch - Push Button Diagnostics in this manual assume a certain skill level and knowledge of Ford-specific diagnostic practices...
Lincoln Aviator 2020-2026 Owners Manual: Radio Transceiver Module
Argentina China Djibouti Ghana Indonesia Jamaica Mauritania Moldova Morocco Pakistan Paraguay Serbia South Africa South Korea KCC-REM-DDG-FO3 Syria Taiwan Ukraine United Arab Emirates (U.A.E.) United States and Canada WARNING: Changes or modifications not expressively approved by the party responsible for compliance could void the user's authority to operate the equipment...
Categories
- Manuals Home
- Lincoln Aviator Owners Manual
- Lincoln Aviator Service Manual
- Disabling Auto-Start-Stop
- Drive Modes
- Body and Paint
- New on site
- Most important about car
Child Seats
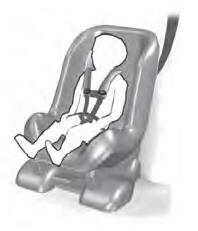
Use a child restraint (sometimes called an infant carrier, convertible seat, or toddler seat) for infants, toddlers and children weighing 40 lb (18 kg) or less (generally four-years-old or younger).
Using Lap and Shoulder Belts
WARNING: Do not place a rearward facing child restraint in front of an active airbag. Failure to follow this instruction could result in personal injury or death.

Copyright © 2026 www.liaviator2.com