
Lincoln Aviator 2020-2026 Service Manual / Body and Paint / Body and Paint / Glass, Frames and Mechanisms / Removal and Installation - Rear Door Glass Run and Bracket
Lincoln Aviator: Glass, Frames and Mechanisms / Removal and Installation - Rear Door Glass Run and Bracket
Removal
NOTE: LH (left-hand) side shown, RH (right-hand) side similar.
NOTE: Removal steps in this procedure may contain installation details.
Aft rear door glass run and bracket
-
Remove the rear door window regulator and motor.
Refer to: Rear Door Window Regulator and Motor (501-11 Glass, Frames and Mechanisms, Removal and Installation).
-
Remove the aft rear door glass run and bracket.
-
Remove the bolts from the aft rear door glass run and bracket.
Torque: 93 lb.in (10.5 Nm)
-
Remove the aft rear door glass run and bracket.
-
Remove the bolts from the aft rear door glass run and bracket.
.jpg) |
Fore rear door glass run and bracket
-
Remove the rear door window regulator and motor.
Refer to: Rear Door Window Regulator and Motor (501-11 Glass, Frames and Mechanisms, Removal and Installation).
-
Remove the fore rear door glass run and bracket.
-
Remove the fore rear door glass run and bracket bolts.
Torque: 93 lb.in (10.5 Nm)
-
Remove the fore rear door glass run and bracket.
-
Remove the fore rear door glass run and bracket bolts.
.jpg) |
Installation
-
To install, reverse the removal procedure.
-
Carry out the power door window initialization.
Refer to: Power Door Window Initialization (501-11 Glass, Frames and Mechanisms, General Procedures).
 Removal and Installation - Rear Door Fixed Window Glass
Removal
NOTE:
The rear window fixed glass assembly is part of the rear door glass top run and cannot be serviced separately.
Remove the rear door glass top run...
 Removal and Installation - Rear Door Glass Top Run
Removal
NOTE:
LH (left-hand) side shown, RH (right-hand) side similar.
NOTE:
Removal steps in this procedure may contain installation details.
Remove the rear door window regulator and motor...
Other information:
Lincoln Aviator 2020-2026 Owners Manual: Departure Time Settings
Select Charge Preferences on the Charge Settings screen. Select Departure Time Setup on the Edit Charge Preferences screen. Two time settings show for each day of the week on the Departure Times schedule screen. Select any one. On the Departure Time settings screen, set your desired departure time, cabin temperature and days of the week to repeat...
Lincoln Aviator 2020-2026 Service Manual: Description and Operation - Engine Ignition - System Operation and Component Description
System Operation Cold Start Emission Reduction Monitor The cold start emission reduction monitor is an on board strategy designed for vehicles that meet the low emissions vehicle-II (LEV-II) emissions standards. The monitor works by detecting the lack of catalyst warm up resulting from a failure to apply sufficient cold start emission reduction during a cold start...
Categories
- Manuals Home
- Lincoln Aviator Owners Manual
- Lincoln Aviator Service Manual
- Body and Paint
- Wireless Accessory Charger (If Equipped)
- Locking and Unlocking
- New on site
- Most important about car
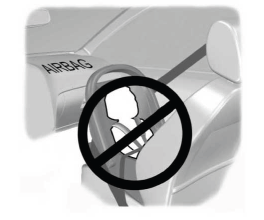
Children and Airbags
WARNING: Airbags can kill or injure a child in a child restraint. Never place a rear-facing child restraint in front of an active airbag. If you must use a forward-facing child restraint in the front seat, move the seat upon which the child restraint is installed all the way back.

Copyright © 2026 www.liaviator2.com