
Lincoln Aviator: Roof Sheet Metal Repairs / Removal and Installation - Roof Rear Frame
Special Tool(s) / General Equipment
| Resistance Spotwelding Equipment | |
| Spot Weld Drill Bit | |
| Locking Pliers |
Removal
-
Refer to: Health and Safety Precautions (100-00 General Information, Description and Operation)..jpg) WARNING:
Before beginning any service procedure in this
manual, refer to health and safety warnings in section 100-00 General
Information. Failure to follow this instruction may result in serious
personal injury.
WARNING:
Before beginning any service procedure in this
manual, refer to health and safety warnings in section 100-00 General
Information. Failure to follow this instruction may result in serious
personal injury.
Refer to: High Voltage System Health and Safety Precautions - Overview (100-00 General Information, Description and Operation).
-
Remove the roof panel.
Refer to: Roof Panel (501-28 Roof Sheet Metal Repairs, Removal and Installation).
Refer to: Roof Panel - Vehicles With: Roof Opening Panel (501-28 Roof Sheet Metal Repairs, Removal and Installation).
-
Position aside wiring harnesses and washer hose from rear frame.
-
Remove the welds.
Use the General Equipment: Spot Weld Drill Bit
.jpg) |
-
Remove the welds.
Use the General Equipment: Spot Weld Drill Bit
.jpg) |
-
Remove the roof rear fame.
.jpg) |
Installation
-
Refer to: Health and Safety Precautions (100-00 General Information, Description and Operation).
WARNING:
Before beginning any service procedure in this
manual, refer to health and safety warnings in section 100-00 General
Information. Failure to follow this instruction may result in serious
personal injury.
Refer to: High Voltage System Health and Safety Precautions - Overview (100-00 General Information, Description and Operation).
-
Install, properly position and clamp the roof rear frame.
Use the General Equipment: Locking Pliers
.jpg) |
-
Install the welds.
Use the General Equipment: Resistance Spotwelding Equipment
.jpg) |
-
NOTE: Factory welds may be replaced with resistance spot welds or MIG plug welds. Resistance spot welds may not be placed directly over original location. They must be placed adjacent to original location and equal factory welds in quantity. MIG plug welds must equal factory welds in both location and quantity
Install the welds.
Use the General Equipment: Resistance Spotwelding Equipment
.jpg) |
-
Reposition the wiring harnesses and washer hose to original location.
-
Install the roof panel.
Refer to: Roof Panel - Vehicles With: Roof Opening Panel (501-28 Roof Sheet Metal Repairs, Removal and Installation).
Refer to: Roof Panel (501-28 Roof Sheet Metal Repairs, Removal and Installation).
 Removal and Installation - Roof Panel - Vehicles With: Roof Opening Panel
Special Tool(s) /
General Equipment
Resistance Spotwelding Equipment
Scraper for Straight Edges
Hot Air Gun
Knife
8 mm Drill Bit
MIG/MAG Welding Equipment
Spot Weld Drill Bit
Locking Pliers
Materials
Name
Specification
Metal Bonding AdhesiveTA-1, TA-1-B, 3M™ 08115, LORD Fusor® 108B
-
Seam SealerTA-2-B, 3M™ 08308, LORD Fusor® 803DTM
-
Removal
WARNING:
Before beginning any service procedure in this
manual, refer to health and safety warnings in section 100-00 General
Information...
 Removal and Installation - Roof Reinforcement
Special Tool(s) /
General Equipment
Resistance Spotwelding Equipment
Spot Weld Drill Bit
Locking Pliers
Removal
NOTE:
Vehicles equipped with a roof opening panel will use the rear most reinforcement only...
Other information:
Lincoln Aviator 2020-2026 Service Manual: Removal and Installation - Front Seat Power Lumbar Assembly - Vehicles Without: Multi-Contour Seats
Removal NOTE: Driver seat shown, passenger seat similar. Remove the front seat. Refer to: Front Seat (501-10A Front Seats, Removal and Installation). Remove the front seat backrest panel. Refer to: Front Seat Backrest Panel (501-10A Front Seats, Removal and Installation)...
Lincoln Aviator 2020-2026 Service Manual: General Procedures - Piston Inspection
Inspection NOTE: Do not use a caustic cleaning solution or a wire brush to clean the pistons or damage can occur. Clean and inspect the (1) ring lands, (2) pin bosses, (3) skirts and the (4) tops of the pistons. If wear marks, scores or glazing is found on the piston skirt, check for a bent or twisted connecting rod...
Categories
- Manuals Home
- Lincoln Aviator Owners Manual
- Lincoln Aviator Service Manual
- Interior Lamps
- USB Port and Power Point Locations
- Locking and Unlocking
- New on site
- Most important about car
Remote Control
Passive Key
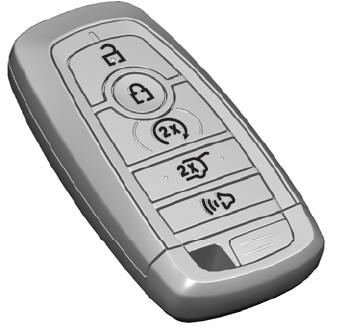
The passive key operates the power locks and the remote start system. The passive key must be in your vehicle to use the push button start.
Note: You may not be able to shift out of park (P) unless the passive key is inside your vehicle.
