Lincoln Aviator 2020-2026 Service Manual / Body and Paint / Body and Paint / Second Row Seats / Removal and Installation - Second Row Single Seat Backrest Cover
Lincoln Aviator: Second Row Seats / Removal and Installation - Second Row Single Seat Backrest Cover
Special Tool(s) / General Equipment
| Interior Trim Remover |
Removal
NOTE: LH (left hand) shown, RH (right hand) similar.
-
Remove the second row seat.
Refer to: Second Row Seat (501-10B Second Row Seats, Removal and Installation).
-
Remove the second row seat head restraint guide sleeve.
Refer to: Second Row Seat Head Restraint Guide Sleeve (501-10B Second Row Seats, Removal and Installation).
-
Release the retainers and remove the second row single seat easy entry seat fold switch bezel.
Use the General Equipment: Interior Trim Remover
.jpg) |
-
-
Remove the second row single seat recline handle retaing clip.
-
Remove the second row seat recline handle.
-
Remove the second row single seat recline handle retaing clip.
.jpg) |
-
Remove the second row single seat center valance.
-
Release the retainer.
-
Release the retainer.
-
Release the retainer.
.jpg) |
-
Remove the second row single seat inboard side shield.
-
Remove the screw.
-
Detach the retainers.
Use the General Equipment: Interior Trim Remover
-
Lift the side shield and pull outward.
-
Lift the side shield and pull outward.
-
Push the side shield forward.
-
Remove the screw.
.jpg) |
-
Remove the second row single seat outboard side shield.
-
Remove the screw.
-
Detach the retainers.
Use the General Equipment: Interior Trim Remover
-
Lift the side shield and pull outward.
-
Lift the side shield and pull outward.
-
Push the side shield forward.
-
Remove the screw.
.jpg) |
-
-
Remove the second row single seat backrest cover child safety seat tether anchor bezel.
Use the General Equipment: Interior Trim Remover
-
Release the second row single seat backrest cover lower J-clip
-
Lift the second row single seat backrest cover.
-
Remove the second row single seat backrest cover child safety seat tether anchor bezel.
.jpg) |
-
-
On both sides.
Unzip the second row single seat backrest cover.
-
Position the second row single seat backrest cover aside.
-
On both sides.
.jpg) |
-
-
Release the hook-and-loop-retainer.
-
Remove the pin-type retainers.
-
Release the hook-and-loop-retainer.
.jpg) |
-
If equipped.
Disconnect the second row single seat backrest heater mat electrical connector and release the retainers.
.jpg) |
-
Remove the second row single seat backrest cover and foam.
.jpg) |
-
NOTICE: Use care when separating the seat backrest trim cover from the hook-and-loop strips or the hook-and-loop strips may be torn from the seat backrest foam.
NOTICE: Use care when separating the seat backrest trim cover from the hook-and arrow or the hook may be torn from the seat backrest foam.
NOTE: This step is only necessary when installing a new component.
Remove the second row single seat backrest cover.
-
Invert the cover.
-
Release the hook-and-loop strips.
-
Release the hook-and-arrows.
-
Invert the cover.
.jpg) |
Installation
-
To install, reverse the removal procedure.
 Removal and Installation - Second Row Seat Head Restraint Guide Sleeve
Special Tool(s) /
General Equipment
Flat-Bladed Screwdriver
Removal
Second row outboard seat
Push the second row outboard seat head restraint release buttons...
 Removal and Installation - Second Row Single Seat Cushion Cover
Special Tool(s) /
General Equipment
Interior Trim Remover
Removal
NOTE:
LH (left hand) seat shown, RH (right hand) seat similar.
Remove the second row seat...
Other information:
Lincoln Aviator 2020-2026 Owners Manual: Export Unique Options
For your particular global region, your vehicle may be equipped with features and options that are different from the features and options that are described in this Owner’s Manual. A market unique supplement may be supplied that complements this book...
Lincoln Aviator 2020-2026 Owners Manual: Cross Traffic Alert System Sensors
The sensors are behind the rear bumper on both sides of your vehicle. Note: Keep the sensors free from snow, ice and large accumulations of dirt. Note: Do not cover the sensors with bumper stickers, repair compound or other objects. Note: Blocked sensors could affect system performance...
Categories
- Manuals Home
- Lincoln Aviator Owners Manual
- Lincoln Aviator Service Manual
- Fuel Quality
- Tire Change Procedure
- Remove and Reinstall the Battery
- New on site
- Most important about car
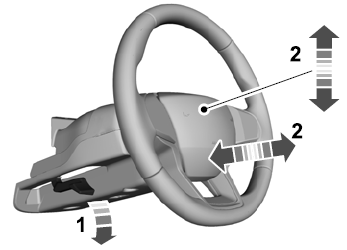
Adjusting the Steering Wheel - Vehicles With: Manual Adjustable Steering Column
WARNING: Do not adjust the steering wheel when your vehicle is moving.
Note: Make sure that you are sitting in the correct position.
Unlock the steering column. Adjust the steering wheel to the desired position.
Copyright © 2026 www.liaviator2.com
