Lincoln Aviator: Starting System - 3.0L EcoBoost / Removal and Installation - Starter Motor
Removal
.jpg) WARNING:
Always disconnect the battery ground cable at the battery
before disconnecting the starter motor battery terminal lead. If a tool
is shorted at the starter motor battery terminal, the tool can quickly
heat enough to cause a skin burn. Failure to follow this instruction may
result in serious personal injury.
WARNING:
Always disconnect the battery ground cable at the battery
before disconnecting the starter motor battery terminal lead. If a tool
is shorted at the starter motor battery terminal, the tool can quickly
heat enough to cause a skin burn. Failure to follow this instruction may
result in serious personal injury.
NOTICE: When removing any turbocharger air intake system components, make sure to cover any open ports to prevent debris from entering the system. The turbocharger compressor vanes can be damaged by even the smallest particles. All components need to be inspected and cleaned prior to installation or reassembly.
NOTE: Removal steps in this procedure may contain installation details.
-
Disconnect the battery.
Refer to: Battery Disconnect and Connect (414-01) .
-
Remove the LH catalytic converter.
Refer to: Catalytic Converter LH (309-00A Exhaust System - 3.0L EcoBoost, Removal and Installation).
-
Loosen the bolt and remove the starter motor shield.
Torque: 53 lb.in (6 Nm)
.jpg) |
-
-
Open the cover case, remove the nut and disconnect the battery positive cable at the starter motor.
Torque: 106 lb.in (12 Nm)
-
Remove the nut and disconnect the starter motor control wire at the starter motor.
Torque: 53 lb.in (6 Nm)
-
Open the cover case, remove the nut and disconnect the battery positive cable at the starter motor.
.jpg) |
-
Remove the bolts and the starter motor.
Torque: 35 lb.ft (47.5 Nm)
.jpg) |
-
Inspect the starter motor drive gear and ring gear.
Refer to: Starter Motor Drive Gear and Flywheel Ring Gear Inspection (303-06A Starting System - 3.0L EcoBoost, General Procedures).
Installation
-
To install, reverse the removal procedure.
 General Procedures - Starter Motor Drive Gear and Flywheel Ring Gear Inspection
Inspection
Remove the starter motor.
Refer to: Starter Motor (303-06A Starting System - 3.0L EcoBoost, Removal and Installation).
Check the wear patterns on the starter motor drive gear
and the flywheel or flexplate ring gear...
Other information:
Lincoln Aviator 2020-2026 Service Manual: General Procedures - Differential Fluid Level Check
Materials Name Specification Motorcraft® SAE 75W-85 Premium Synthetic Hypoid Gear LubricantXY-75W85-QL WSS-M2C942-A Check With the vehicle in NEUTRAL, position it on a hoist. Refer to: Jacking and Lifting (100-02 Jacking and Lifting, Description and Operation)...
Lincoln Aviator 2020-2026 Service Manual: Removal and Installation - Ignition Switch - Vehicles With: Keyless Vehicle System
Removal NOTE: Removal steps in this procedure may contain installation details. Remove and disconnect the switch pack. Remove trim panel. Remove trim panel. Remove the retainer...
Categories
- Manuals Home
- Lincoln Aviator Owners Manual
- Lincoln Aviator Service Manual
- Fuel Quality
- Description and Operation - Body and Frame
- Anti-Theft Alarm
- New on site
- Most important about car
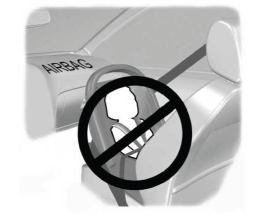
Children and Airbags
WARNING: Airbags can kill or injure a child in a child restraint. Never place a rear-facing child restraint in front of an active airbag. If you must use a forward-facing child restraint in the front seat, move the seat upon which the child restraint is installed all the way back.


