
Lincoln Aviator 2020-2026 Service Manual / Chassis / Suspension / Vehicle Dynamic Suspension / Removal and Installation - Vehicle Dynamics Control Module (VDM)
Lincoln Aviator: Vehicle Dynamic Suspension / Removal and Installation - Vehicle Dynamics Control Module (VDM)
Special Tool(s) / General Equipment
| Interior Trim Remover |
Removal
NOTICE: Electronic modules are sensitive to static electrical charges. If exposed to these charges, damage may result.
NOTE: Removal steps in this procedure may contain installation details.
-
Remove the luggage compartment floor covering.
.jpg) |
-
Release the clips and remove the luggage compartment side trim panel.
Use the General Equipment: Interior Trim Remover
.jpg) |
-
Remove the VDM.
-
Disconnect the VDM electrical connectors.
-
Remove the retainers and the VDM.
Torque: 71 lb.in (8 Nm)
-
Disconnect the VDM electrical connectors.
.jpg) |
Installation
-
To install, reverse the removal procedure.
-
Calibrate the VDM. Connect the scan tool and carry out the Ride Height Calibration routine. Follow the scan tool directions.
 Removal and Installation - Rear Suspension Height Sensor
Removal
NOTE:
Removal steps in this procedure may contain installation details.
Remove the wheel and tire.
Refer to: Wheel and Tire (204-04A Wheels and Tires, Removal and Installation)...
 Driveline
..
Other information:
Lincoln Aviator 2020-2026 Owners Manual: Activating the Manual Park Release Cable
Apply the parking brake.Note: If vehicle battery is dead, for example, no electrical power is available, you could require an external power source to apply the parking brake. Using the key or a flat head screwdriver 4.7 in (120 mm), carefully open the access cover under the arm rest console...
Lincoln Aviator 2020-2026 Service Manual: Description and Operation - Plastic Repairs
Plastic Components NOTE: Left hand side shown, right hand side similar. The following illustration is not all-inclusive of trim levels available. The actual trim level of the vehicle will determine the viability of carrying out a plastics repair...
Categories
- Manuals Home
- Lincoln Aviator Owners Manual
- Lincoln Aviator Service Manual
- Keyless Entry
- Body and Paint
- Description and Operation - Body and Frame
- New on site
- Most important about car
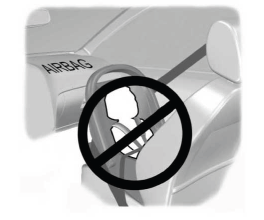
Children and Airbags
WARNING: Airbags can kill or injure a child in a child restraint. Never place a rear-facing child restraint in front of an active airbag. If you must use a forward-facing child restraint in the front seat, move the seat upon which the child restraint is installed all the way back.

Copyright © 2026 www.liaviator2.com