Lincoln Aviator 2020-2026 Owners Manual / Transmission / Manual Park Release / Activating the Manual Park Release Cable
Lincoln Aviator: Manual Park Release / Activating the Manual Park Release Cable
- Apply the parking brake.
Note: If vehicle battery is dead, for example, no electrical power is available, you could require an external power source to apply the parking brake.
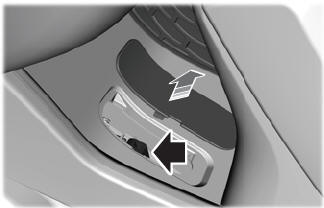
- Using the key or a flat head screwdriver 4.7 in (120 mm), carefully open the access cover under the arm rest console.
- Turn the vehicle ignition on without starting the vehicle. Press the push to start button without pressing the brake.
- Once in the driver seat, fully apply the brake pedal and hold. Do not release.
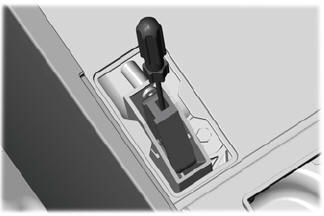
- Insert a screwdriver or your car key into
the Manual Park Release lever slot, pull
the Manual Park Release lever toward
the rear until the detent in the slot pops
up against the screwdriver or key. Allow
0.3 in (7 mm) of full upward travel of the
detent, which locks in the park override
mode, and you can remove the
screwdriver or key. If done correctly, a
message on the instrument cluster
displays Park Not Available, Transmission
Not in Park or Shift System Fault.
Note: A screwdriver tool longer than 4.7 in (120 mm) could hit the underside of the armrest console before you achieve full travel of the detent.
- With your foot still fully applied on the brake pedal, disengage the parking brake.
- Your vehicle remains in neutral (N) for emergency towing purposes.
- Switch off the ignition.
- Once it is safe to do so, and there is no risk of your vehicle rolling, disconnect the negative, black, battery cable from the battery.
 Manual Park Release
WARNING: When doing this
procedure, you need to take the
transmission out of park (P) which means
your vehicle can roll freely. To avoid
unwanted vehicle movement, always fully
apply the parking brake prior to doing this
procedure...
 Returning Your Vehicle to Normal Mode
Once it is safe to do so, reconnect the
negative, black, battery cable to the
battery.
Apply the parking brake.Note: If the vehicle battery is dead,
you
could require an external power source to
apply the parking brake...
Other information:
Lincoln Aviator 2020-2026 Owners Manual: Canceling the Set Speed. Resuming the Set Speed
Canceling the Set Speed Press the button or tap the brake pedal. The set speed does not erase. Resuming the Set Speed Press the button. Your vehicle speed returns to the previously set speed and gap setting. The set speed displays continuously in the information display when the system is active...
Lincoln Aviator 2020-2026 Service Manual: Removal and Installation - Charge Air Cooler (CAC) Intake Pipe
Special Tool(s) / General Equipment Hose Clamp Remover/Installer Removal NOTICE: The turbocharger compressor vanes can be damaged by even the smallest particles. When removing any turbocharger or engine air intake system component, ensure that no debris enters the system...
Categories
- Manuals Home
- Lincoln Aviator Owners Manual
- Lincoln Aviator Service Manual
- Locking and Unlocking
- Wireless Accessory Charger (If Equipped)
- Interior Lamps
- New on site
- Most important about car
Activating Intelligent Access
The intelligent access key must be within 3 ft (1 m) of the door or luggage compartment you intend to lock or unlock.
At a Door
Electronic door handles are on each door. Gently depress the switch inside the exterior door handle to unlock and open the door. An unlock symbol illuminates on the door window trim indicating your vehicle is unlocked.

Copyright © 2026 www.liaviator2.com