Lincoln Aviator: Battery, Mounting and Cables / Diagnosis and Testing - Battery
General Equipment
| Diagnostic Battery Charger |
-
Use Ford approved battery test equipment.
-
Midtronics MDX-650 or P-300/P-600/490/1050
-
Midtronics GRX-3590 or 3000
-
Midtronics MDX-650 or P-300/P-600/490/1050
Diagnostics in this manual assume a certain skill level and knowledge of Ford-specific diagnostic practices.
REFER to: Diagnostic Methods (100-00 General Information, Description and Operation).
Diagnostic Trouble Code (DTC) Chart
Diagnostics in this manual assume a certain skill level and knowledge of Ford-specific diagnostic practices.
REFER to: Diagnostic Methods (100-00 General Information, Description and Operation).
Diagnostic Trouble Code Chart
| Module | DTC | Description | Action |
|---|---|---|---|
| BCM | B11D9:09 | Vehicle Battery:Component Failures | GO to Pinpoint Test C |
Symptom Chart
Diagnostics in this manual assume a certain skill level and knowledge of Ford-specific diagnostic practices.
REFER to: Diagnostic Methods (100-00 General Information, Description and Operation).
Symptom Chart: Battery
| Condition | Action |
| Main engine compartment battery is not fully charged | GO to Pinpoint Test A |
| Auxiliary battery is not fully charged | GO to Pinpoint Test B |
Pinpoint Test
.jpg) PINPOINT TEST A : MAIN ENGINE COMPARTMENT BATTERY CONDITION TEST
PINPOINT TEST A : MAIN ENGINE COMPARTMENT BATTERY CONDITION TEST|
Normal Operation and Fault Conditions Battery condition is determined by measuring battery terminal voltage after a specific discharge current is applied for a specified time period. Possible Sources
Visual Inspection and Pre-checks
|
||||
| A1 TEST THE MAIN ENGINE COMPARTMENT BATTERY CONDITION | ||||
|
NOTE: Failure to fully charge the battery before retesting may cause false readings.
Is the battery OK?
|
.jpg) PINPOINT TEST B : AUXILIARY BATTERY CONDITION TEST
PINPOINT TEST B : AUXILIARY BATTERY CONDITION TEST|
Normal Operation and Fault Conditions Battery condition is determined by measuring battery terminal voltage after a specific discharge current is applied for a specified time period. Possible Sources
Visual Inspection and Pre-checks
|
||||
| B1 TEST THE AUXILIARY BATTERY CONDITION | ||||
|
NOTE: Failure to fully charge the battery before retesting may cause false readings.
Is the auxiliary battery voltage greater than 12 volts?
|
.jpg) PINPOINT TEST C : B11D9:09
PINPOINT TEST C : B11D9:09|
Normal Operation and Fault Conditions The BCM monitors both the main battery and auxiliary battery. The main battery has a BMS and the auxiliary battery has a battery current sensor. The BMS for the main battery communicates on a dedicated LIN to the BCM. The battery current sensor for the auxiliary battery uses a PWM circuit which is wired to the BCM. DTC Fault Trigger Conditions
Possible Sources
Visual Inspection and Pre-checks
|
||||||
| C1 INSPECT ALL BATTERY CONNECTIONS | ||||||
Are all battery cable connections securely fasten to the main and auxiliary battery?
|
||||||
| C2 CHECK THE AUXILIARY BATTERY FUSE | ||||||
Are the auxiliary battery fuses ok?
|
||||||
| C3 VERIFY THE BATTERIES CONDITION | ||||||
Do the main engine compartment battery and auxiliary battery pass the condition test?
|
 Description and Operation - Battery and Cables - System Operation and Component Description
System Operation
Gasoline Vehicles
The
main battery, which is located in the engine compartment, is a 12 volt
DC source connected in a negative ground system and is a voltage
stabilizer for the 12 volt electrical system...
 General Procedures - Battery Charging
Charging
WARNING:
Before beginning any service procedure in this section,
refer to Safety Warnings in section 100-00 General Information. Failure
to follow this instruction may result in serious personal injury...
Other information:
Lincoln Aviator 2020-2026 Service Manual: Removal and Installation - Oil Pump Drive Belt
Removal NOTICE: During engine repair procedures, cleanliness is extremely important. Any foreign material, including any material created while cleaning gasket surfaces, that enters the oil passages, coolant passages or the oil pan, can cause engine failure...
Lincoln Aviator 2020-2026 Service Manual: General Procedures - Transport Mode Deactivation
Deactivation NOTE: After vehicle build, some vehicle modules are set in Transport mode including the IPC and the BCM. Transport mode reduces battery drain during longer periods where the vehicle is not used. While in transport mode, the IPC displays TRANSPORT MODE CONTACT DEALER in the message center...
Categories
- Manuals Home
- Lincoln Aviator Owners Manual
- Lincoln Aviator Service Manual
- Garage Door Opener
- Locking and Unlocking
- Keyless Entry
- New on site
- Most important about car
Activating Intelligent Access
The intelligent access key must be within 3 ft (1 m) of the door or luggage compartment you intend to lock or unlock.
At a Door
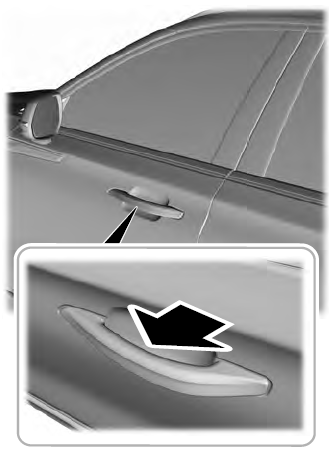
Electronic door handles are on each door. Gently depress the switch inside the exterior door handle to unlock and open the door. An unlock symbol illuminates on the door window trim indicating your vehicle is unlocked.


.jpg) PINPOINT TEST A : MAIN ENGINE COMPARTMENT BATTERY CONDITION TEST
PINPOINT TEST A : MAIN ENGINE COMPARTMENT BATTERY CONDITION TEST